QML Context Properties and Objects
In Part 5 we'll learn how to integrate C++ and QML. In most cases this means accessing C++ from QML, and it will be our focus. It is also possible to access QML objects from C++, but generally this is not what you want to do, except perhaps for testing purposes, so we're not going into that here.
All communication between C++ and QML happens via the Qt Meta-Object System.
- Signals & Slots can be connected
- Properties can be accessed and modified
-
C++ slots and methods marked as
Q_INVOKABLEcan be called from QML -
Enumerations registered with
Q_ENUMcan be accessed from QML
QML Context
C++ objects and values can be embedded directly into the context of loaded QML objects using context properties and context objects. This is achieved through the QQmlContext class provided by the Qt QML module, which exposes data to the context of a QML component, allowing data to be injected from C++ into QML.
Each QQmlContext contains a set of properties, distinct from its QObject properties, that allow data to be explicitly bound to a context by name.
Contexts form a hierarchy, the root of which is the QML engine's root context. The root context is automatically created by the QQmlEngine. Data that should be available to all QML component instances instantiated by the engine should be put in the root context. Additional data that should only be available to a subset of component instances should be added to sub-contexts parented to the root context. Child contexts inherit the context properties of their parents; if a child context sets a context property that already exists in its parent, the new context property overrides that of the parent.
Context Properties
You can expose context properties with the setContextProperty method. It's possible to expose both value types supported by QVariant, and pointers to QObjects. The former simply exposes the value you set to be available by the property name, while the latter exposes the object itself.
For example:
// main.cpp
#include <QGuiApplication>
#include <QQmlApplicationEngine>
#include <QQmlContext>
#include <QColor>

int main(int argc, char *argv[])
{
    QGuiApplication app(argc, argv);
    QQmlApplicationEngine engine;

    QQmlContext* context = engine.rootContext();
    context->setContextProperty("myBackgroundColor", QColor(Qt::yellow));
    context->setContextProperty("myText", "I'm text from C++!");

    context->setContextProperty("application", &app);

    engine.load(QUrl(QStringLiteral("qrc:/main.qml")));
    if (engine.rootObjects().isEmpty())
        return -1;

    return app.exec();
}
// main.qml
import QtQuick 2.9
import QtQuick.Window 2.3

Window {
    width: 640; height: 480; visible: true

    Rectangle {
        objectName: "rectangle"
        width: 200; height: 100
        color: myBackgroundColor

        Text {
            id: textField
            anchors.centerIn: parent
            font.pixelSize: 18
            text: myText
        }

        MouseArea {
            anchors.fill: parent
            onClicked: {
                application.quit();
            }
        }
    }
}
Here, we exposed the values named "myBackgroundColor" and "myText", which are then simply available in QML by the property name.
We also exposed the view itself as "application" allowing us to quit the app. Note that this is just for the sake of an example! Normally we'd use Qt.quit(), but this demonstrates how to call slots from QML. We'll talk more about exposing and using C++ objects in QML in the next chapter.
Context Objects
To simplify binding and maintaining larger data sets, all the properties of an object can be exposed with setContextObject. All the properties of the context object are available by name in the context, as though they were all individually set with setContextProperty.
Note that this is distinct from exposing an object with setContextProperty. When you expose an object with setContextProperty the object itself is available in QML, like in the previous example with "application". When you expose an object with setContextObject only the properties of the context are available, as previously stated.
Also note that all properties explicitly added with setContextProperty take precedence over the context object's properties.
For example:
// myclass.h
#include <QObject>
#include <QColor>
class MyClass : public QObject
{
    Q_OBJECT
    Q_PROPERTY(QColor myColor MEMBER m_color NOTIFY colorChanged)
    Q_PROPERTY(QString myText MEMBER m_text NOTIFY textChanged)

public:
    explicit MyClass(QObject* parent = nullptr);

signals:
    void colorChanged();
    void textChanged(const QString &newText);

private:
    QColor m_color;
    QString m_text;
};


// main.cpp
context->setContextObject(&myClass);
Accessing C++ from QML
In the last chapter we already saw a simple example about exposing a C++ object to QML using context properties. In this chapter we'll discuss that in more detail, by going through various ways you can use C++ objects in QML, and seeing what requirements that entails on the C++ side.
When a QObject instance is exposed with setContextProperty, the objects properties, signals, slots, methods marked with Q_INVOKABLE, and enums registered with Q_ENUM, are accessible from QML. Let's look at an example.
// simpleclass.h
#include <QObject>
#include <QColor>

class SimpleClass : public QObject
{
    Q_OBJECT
    Q_PROPERTY(QColor backgroundColor MEMBER m_backgroundColor NOTIFY backgroundColorChanged)

public:
    explicit SimpleClass(QObject *parent = nullptr);
    Q_INVOKABLE void usefulMethod();

signals:
    void backgroundColorChanged();

public slots:
    void reactToColorChange();

private:
    QColor m_backgroundColor;
};
// simpleclass.cpp
#include "simpleclass.h"

SimpleClass::SimpleClass(QObject *parent) :
    QObject(parent),
    m_backgroundColor(QColor(Qt::blue))
{
}

void SimpleClass::usefulMethod()
{
    qDebug("I'm being useful :)");
}

void SimpleClass::reactToColorChange()
{
    qDebug("Color changed!");
}
// main.cpp
#include "simpleclass.h"
#include <QGuiApplication>
#include <QQmlApplicationEngine>
#include <QQmlContext>

int main(int argc, char *argv[])
{
    QGuiApplication app(argc, argv);

    QQmlApplicationEngine engine;
    QQmlContext* context(engine.rootContext());
    context->setContextProperty("simpleClass", new SimpleClass(&engine));

    engine.load(QUrl(QStringLiteral("qrc:/main.qml")));

    return app.exec();
}
// main.qml
import QtQuick 2.6
import QtQuick.Window 2.2

Window {
    visible: true
    width: 640
    height: 480
    title: qsTr("Exposed QObject")

    Rectangle {
        id: rectangle
        anchors.fill: parent
        focus: true
        color: simpleClass.backgroundColor
        Text {
            anchors.centerIn: parent
            font.pixelSize: 18
            text: "Hello World!"
        }
        MouseArea {
            anchors.fill: parent
            onClicked: {
                simpleClass.backgroundColor = Qt.rgba(1, 0, 0, 1)
            }
        }
        Keys.onSpacePressed: simpleClass.usefulMethod()
    }

    Connections {
        target: simpleClass
        onBackgroundColorChanged: simpleClass.reactToColorChange()
    }
}
Lot of this is familiar from the last chapter. As you can see after exposing the object with setContextProperty we can access the property backgroundColor by name. We can also access the method usefulMethod() because we declared it with the macro Q_INVOKABLE. We can also call the public slot reactToColorChange() from QML.
The example above doesn't have enums, but the usage is simple. You declare the enums like you would normally, and then use the Q_ENUM macro to register it in the meta-object system.
#include <QObject>

class MyClass : public QObject
{
    Q_OBJECT

public:
    enum Status { Loading, Ready };
    Q_ENUM(Status)
    ...
}
Use context properties to expose Gizmo to the QML engine in main.cpp
In main.qml:
- Create a Rectangle that fills the window, get the background color from Gizmo.
- Inside the rectangle there should be text, which is the Gizmo's userText.
- Clicking the Rectangle should change Gizmo's background color to red.
- Doubleclicking the Rectangle should call Gizmos invokable function frobnicate().
- Signal onBackgroundColorChanged should change Gizmo's userText to "Background colour changed to [Gizmo's background color]".
This exercise isn't currently tested, just submit it when you're ready. We'll do spot checks to make sure nobody submits empty "solutions".
You can copy the main.qml solution from the last exercise for this one.
This time, intead of just exposing Gizmo to the root context property, you'll implement ContextApplication::createWindow in contextapplication.cpp to allow the application to start up multiple independent windows. You'll find specific instructions on what to do in the contextapplication.cpp file.
This exercise isn't currently tested, just submit it when you're ready. On this one, if the exercise seems too confusing, just submit it and check the model solution. Be sure to give us feedback if the exercise does seem poorly guided!
Data Models
Often we want to use data from C++ to show in a QML view. We talked about views in Part 4, but didn't go into C++ side yet. In the following chapters we're going to learn about making our own models, but let's see here how we can populate a simple QStringList with data in C++ and use it in QML by exposing it to the QML context.
QStringList myList;
myList.append("Dog");
myList.append("Cat");
myList.append("Mouse");
myList.append("Dolphin");

QQmlApplicationEngine engine;
QQmlContext* context(engine.rootContext());
context->setContextProperty("myModel", QVariant::fromValue(myList));
ListView {
    width: 200; height: 200
    anchors.fill: parent

    model: myModel
    delegate: Rectangle {
        height: 30; width: 200
        Text {
            text: model.modelData
        }
    }
}
Adding New QML Types
So far we've discussed how to expose an object instance to the QML context. Sometimes we want to register the class itself to be used in QML. The registration allows the class to be used as a data type from QML. Additionally registration can provide other features, such as allowing a class to be used as an instantiable QML object type from QML, or enabling a singleton instance fo the class to be imported and used from QML.
Usually we register classes that derive from QObject that use the macro Q_OBJECT, but it is also possible to register a "lighter" version of QObject, declared with a Q_GADGET macro instead. In these lighter classes we have access to properties, enums, and invokable methods, but not to the signals and slots system. But more on that a little bit later.
Registration
Instantiable Types
To register a QObject-derived class as an instantiable QML object type, call qmlRegisterType() to register the class as QML type into a particular type namespace. Clients can then import that namespace in order to use that type.
For example, suppose there is a Message class with author and creationDate properties:
class Message : public QObject
{
    Q_OBJECT
    Q_PROPERTY(QString author READ author WRITE setAuthor NOTIFY authorChanged)
    Q_PROPERTY(QDateTime creationDate READ creationDate WRITE setCreationDate NOTIFY creationDateChanged)
public:
    // ...
};
This type can be registered by calling qmlRegisterType() with an appropriate type namespace and version number. For example, to make the type available in the com.mycompany.messaging namespace with version 1.0:
qmlRegisterType<Message>("com.mycompany.messaging", 1, 0, "Message");
The type can be used in an object declaration from QML, and its properties can be read and written to, as per the example below:
import com.mycompany.messaging 1.0

Message {
    author: "Amelie"
    creationDate: new Date()
}
Non-instantiable Types
Sometimes a QObject-derived class may need to be registered with the QML type system but not as an instantiable type. For example, this is the case if a C++ class:
- is an interface type that should not be instantiable
- is a base class type that does not need to be exposed to QML
- declares some enum that should be accessible from QML, but otherwise should not be instantiable
- is a type that should be provided to QML through a singleton instance, and should not be instantiable from QML
The Qt QML module provides several methods for registering non-instantiable types:
-
qmlRegisterType()(with no parameters) registers a C++ type that is not instantiable and cannot be referred to from QML. This enables the engine to coerce any inherited types that are instantiable from QML. -
qmlRegisterInterface()registers a Qt interface type with a specific QML type name. The type is not instantiable from QML but can be referred to by its type name. -
qmlRegisterUncreatableType()registers a named C++ type that is not instantiable but should be identifiable as a type to the QML type system. This is useful if a type's enums or attached properties should be accessible from QML but the type itself should not be instantiable. -
qmlRegisterSingletonType()registers a singleton type that can be imported from QML.
For example, let's talk about a Singleton type.
A QObject singleton type can be interacted with in a manner similar to any other QObject or instantiated type, except that only one (engine constructed and owned) instance will exist, and it must be referenced by type name rather than id. Q_PROPERTYs of QObject singleton types may be bound to, and Q_INVOKABLE functions of QObject module APIs may be used in signal handler expressions. This makes singleton types an ideal way to implement styling or theming.
Say we have a singleton type for theming registered into MyThemeModule namespace with version 1.0, where that QObject has a QColor color property. We can then use it simply with:
import MyThemeModule 1.0 as Theme

Rectangle {
    color: Theme.color // binding.
}
Another example would be a case where we have a class just for enumerations. As a side note, in this case we can use the lighter Q_GADGET macro mentioned before (as we won't be needing signals and slots):
// modeclass.h
#include <QObject>

class ModeClass
{
    Q_GADGET
public:
    explicit ModeClass();
    enum Mode { Slow, Normal, Fast, UsainBolt };
    Q_ENUM(Mode)
};
and register it with:
qmlRegisterUncreatableType<ModeClass>("com.mycompany.modes", 1, 0, "ModeClass", "Message");
Creating Custom QObjects
Let's look at how to create a custom QObject-derived class for use in QML by starting with an example:
// cppperson.h
class CppPerson : public QObject
{
    Q_OBJECT
    Q_PROPERTY(QString name READ name WRITE setName NOTIFY nameChanged)
    Q_PROPERTY(int shoeSize READ shoeSize WRITE setShoeSize NOTIFY shoeSizeChanged)
public:
    CppPerson(QObject *parent = nullptr);

    QString name() const;
    void setName(const QString &name);

    int shoeSize() const;
    void setShoeSize(int size);

signals:
    void nameChanged();
    void shoeSizeChanged();

private:
    QString m_name;
    int m_shoeSize;
};
// cppperson.cpp
#include "cppperson.h"

CppPerson::CppPerson(QObject *parent) :
    QObject(parent), m_shoeSize(0)
{
}

QString CppPerson::name() const
{
    return m_name;
}

void CppPerson::setName(const QString &name)
{
    if (m_name != name) {
        m_name = name;
        emit nameChanged();
    }
}

int CppPerson::shoeSize() const
{
    return m_shoeSize;
}

void CppPerson::setShoeSize(int size)
{
    if (m_shoeSize != size) {
        m_shoeSize = size;
        emit shoeSizeChanged();
    }
}
// main.cpp
...
qmlRegisterType<CppPerson>("People", 1,0, "Person");
...
// main.qml
import QtQuick 2.9
import QtQuick.Window 2.3
import People 1.0

Window {
    width: 640; height: 480
    visible: true

    Rectangle {
        anchors.fill: parent

        // Person is implemented in C++
        Person {
            id: person
            name: "Bob Jones"
            shoeSize: 12
            onNameChanged: {
                console.log("New name: " + name)
            }
            onShoeSizeChanged: {
                console.log("New shoe size: " + shoeSize)
            }
        }

        Column {
            anchors.fill:  parent
            spacing: 20
            Text {
                font.bold: true
                font.pixelSize: 26
                text: "Person name: " + person.name
            }
            Text {
                font.bold: true
                font.pixelSize: 26
                text: "Person shoe size: " + person.shoeSize
            }
        }

        MouseArea {
            anchors.fill: parent
            onClicked: {
                person.name = "John Doe"
                person.shoeSize = 9
            }
        }
    }
}
The C++ side should be starting to look familiar by now, we declare the properties and their accessors and signals with Q_PROPERTY in the header file, and implement the getters and setters in cppperson.cpp (and not forgetting to emit those xxxChanged signals in the setters!).
On QML we import the now-registered type, and then use it like we would any other QML type. Property bindings are done by name like usual, and slots for the signal automatically exists following the naming convention onXxxChanged.
QStandardItemModel
A common need is to implement a model in C++ to store data, which is then displayed in QML. More specialized usecases often require us to write our own model, for example in the next chapter we'll be implementing our own Table model by subclassing QAbstractTableModel (which itself inherits QAbstractItemModel). Qt also provides a simple general-purpose model for storing custom data, called QStandardItemModel.
// mymodel.h
#include <QStandardItemModel>

class MyModel : public QStandardItemModel
{
    Q_OBJECT
public:
    enum Roles {
        BrandRole = Qt::UserRole + 1,
        ModelRole
    };

    explicit MyModel(QObject *parent = nullptr);

    QHash<int, QByteArray> roleNames() const Q_DECL_OVERRIDE;

    Q_INVOKABLE void addCar(const QString &brand, const QString &model);
};
// mymodel.cpp
#include "mymodel.h"

MyModel::MyModel(QObject *parent) : QStandardItemModel(parent)
{
}

QHash<int, QByteArray> MyModel::roleNames() const
{
    QHash<int, QByteArray> mapping = QStandardItemModel::roleNames();
    mapping[BrandRole] = "brand";
    mapping[ModelRole] = "model";
    return mapping;
}

void MyModel::addCar(const QString &brand, const QString &model)
{
    QStandardItem *item = new QStandardItem;
    item->setData(brand, BrandRole);
    item->setData(model, ModelRole);
    appendRow(item);
}
The most imporant part to note here is overriding of the roleNames() function, where the named roles are mapped to numbers (enums). This allows us to refer to the data in QML with the names "brand" and "model".
Also, don't forget to declare addCar with Q_INVOKABLE to allow it's usage in QML.
// main.cpp
qmlRegisterType<MyModel>("org.mooc.cars", 1, 0, "MyModel");
// main.qml
import QtQuick 2.9
import QtQuick.Window 2.2
import org.mooc.cars 1.0

Window {
    visible: true
    width: 640
    height: 480
    title: qsTr("Cars")

    MyModel {
        id: cars
    }

    ListView {
        anchors.fill: parent
        model: cars
        delegate: Text {
            text: "The brand is " + brand + " and the model is " + model
        }
    }

    // Some way to populate the model, cars.addCar("brand", "model")
    ...
}
QML Plugins
When a custom QML component is imported it's loaded into memory at the start. To shorten start times you can make the component a plugin instead, in which case it's dynamically loaded once you create an object.
To write a QML extension plugin we:
-
Subclass
QQmlExtensionPlugin - Write a project file for the plugin
-
Create a
qmldirfile to describe the plugin
Suppose we have a TimeModel C++ class that should be made available as a new QML type. It provides the current time through hour and minute properties.
class TimeModel : public QObject
{
    Q_OBJECT
    Q_PROPERTY(int hour READ hour NOTIFY timeChanged)
    Q_PROPERTY(int minute READ minute NOTIFY timeChanged)
    ...
Now we create a class called QExampleQmlPlugin which inherits QmlExtensionPlugin:
class QExampleQmlPlugin : public QQmlExtensionPlugin
{
    Q_OBJECT
    Q_PLUGIN_METADATA(IID QQmlExtensionInterface_iid)

public:
    void registerTypes(const char *uri) override
    {
        Q_ASSERT(uri == QLatin1String("TimeExample"));
        qmlRegisterType<TimeModel>(uri, 1, 0, "Time");
    }
};
-
We use the
Q_PLUGIN_METADATA()macro to register the plugin with the meta object system with a unique identifier. -
We override the
registerTypes()method to register theTimeModeltype withqmlRegisterType. -
Q_ASSERTisn't mandatory here, but we can use it to ensure the type namespace is imported correctly by any QML components that use this plugin.
Next, we need a .pro project file:
TEMPLATE = lib
CONFIG += qt plugin
QT += qml

DESTDIR = imports/TimeExample
TARGET = qmlqtimeexampleplugin
SOURCES += qexampleqmlplugin.cpp
It defines the project as a plugin library, specifies the built directory, and register the plugin target name.
Lastly, we need a qmldir file to describe the plugin:
module TimeExample
plugin qmlqtimeexampleplugin
C++ Models in QML
We've talked about making your own models to present data in QML few times now, and in the last chapter we saw basic example of QStandardItemModel. Often it's needed to implement your own model from the start for performance and functionality reasons. QAbstactItemModel class provides the abstract interface for item model classes, and it can be subclassed to create your own models. QAbstractListModel and QAbstractTableModel inherit QAbstractItemModel and can be subclassed instead when making list or table models. In this chapter we'll be taking a closer look at QAbstractTableModel.
QAbstractTableModel
When making your own table model by subclassing QAbstractTableModel, you must at the very least implement functions rowCount(), columnCount(), and data().
To make our model available in QML we also need to reimplement roleNames (like in the QStandardItemModel example in the last chapter).
Editable models need to also implement setData() and flags().
Models that provide interfaces to resizable data structures can provide implementations for inserting and removing rows and columns as well, but if you do so it's important to remember to call appropriate functions so that all connected views are aware of any changes:
-
beginInsertRows()/beginInsertColumns()must be called before inserting new rows and/or columns into the data structure, andendInsertRows()/endInsertColumns()immediately afterwards. -
removeRows()/removeColumns()must be called before removing rows and/or columns from the data structure, andendRemoveRows()/endRemoveColumsn()immediately afterwards.
Example
In the header we define Car as the item we're storing in the table. Enums for roles are done in the same manner as we did in QStandardItemModel. When subclassing QAbstractTableModel we need to implement, at minimum, rowCount(), columnCount(), data(), and roleNames():
// customtablemodel.h
#include <QAbstractTableModel>

struct Car
{
    QString manufacturer;
    QString model;
    qint16 year;
};
typedef QVector<Car> CarContainer;

class CustomTableModel : public QAbstractTableModel
{
    Q_OBJECT
public:
    enum CarRoles {
        ManufacturerRole = Qt::UserRole + 1,
        ModelRole,
        YearRole
    };

    explicit CustomTableModel(QObject *parent = nullptr);

protected:
    int rowCount(const QModelIndex &parent) const Q_DECL_OVERRIDE;
    int columnCount(const QModelIndex &parent) const Q_DECL_OVERRIDE;
    QVariant data(const QModelIndex &index, int role) const Q_DECL_OVERRIDE;
    QHash<int, QByteArray> roleNames() const Q_DECL_OVERRIDE;

private:
    CarContainer m_container;
};
The code in .cpp file is fairly self-explanatory. We're adding data in the constructor just for the example:
// customtablemodel.cpp
#include "customtablemodel.h"
CustomTableModel::CustomTableModel(QObject *parent) :
QAbstractTableModel(parent)
{
m_container = {
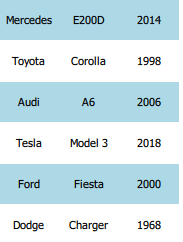
Car{"Mercedes", "E200D", 2014},
Car{"Toyota", "Corolla", 1998},
Car{"Audi", "A6", 2006},
Car{"Tesla", "Model 3", 2018},
Car{"Ford", "Fiesta", 2000},
Car{"Dodge", "Charger", 1968},
};
}
int CustomTableModel::rowCount(const QModelIndex &parent) const
{
Q_UNUSED(parent)
return m_container.count();
}
int CustomTableModel::columnCount(const QModelIndex &parent) const
{
Q_UNUSED(parent)
return 3;
}
QVariant CustomTableModel::data(const QModelIndex &index, int role) const
{
switch(role)
{
case ManufacturerRole:
return m_container[index.row()].manufacturer;
case ModelRole:
return m_container[index.row()].model;
case YearRole:
return m_container[index.row()].year;
}
return QVariant();
}
QHash<int, QByteArray> CustomTableModel::roleNames() const
{
QHash<int, QByteArray> roles;
roles[ManufacturerRole] = "manufacturer";
roles[ModelRole] = "model";
roles[YearRole] = "year";
return roles;
}
Then we register it like before (Note that in this example the only data is from the constuctor, as we didn't implement functionality to add data from QML.):
// main.cpp
qmlRegisterType<CustomTableModel>("org.mooc.customtable", 1, 0, "CustomTableModel");
On the QML side we are using the new TableView item that was introduced in Qt 5.12, so remember to import QtQuick 2.12 (Note: Don't confuse it with the deprecated Quick Controls 1 TabelView). We also use the DelegateChooser here, that is still in labs as of Qt 5.12, so you need to import Qt.labs.qmlmodels 1.0
The data from our model is available by the role names we defined in roleNames() function.
import QtQuick 2.12
import QtQuick.Window 2.12
import org.mooc.customtable 1.0
import Qt.labs.qmlmodels 1.0

Window {
    visible: true
    width: 640
    height: 480
    title: qsTr("CustomTableModel")

    TableView {
        anchors.fill: parent
        columnSpacing: 0
        rowSpacing: 1
        clip: true

        model: CustomTableModel {}

        delegate: DelegateChooser {
            DelegateChoice {
                column: 0
                Rectangle {
                    implicitWidth: 80
                    implicitHeight: 40
                    color: {
                        if (row % 2 == 0)
                            "lightblue";
                        else
                            "white";
                    }
                    Text {
                        anchors.centerIn: parent
                        text: manufacturer
                    }
                }
            }
            DelegateChoice {
                column: 1
                Rectangle {
                    implicitWidth: 80
                    implicitHeight: 40
                    color: {
                        if (row % 2 == 0)
                            "lightblue";
                        else
                            "white";
                    }
                    Text {
                        anchors.centerIn: parent
                        text: model
                    }
                }
            }
            DelegateChoice {
                column: 2
                Rectangle {
                    implicitWidth: 80
                    implicitHeight: 40
                    color: {
                        if (row % 2 == 0)
                            "lightblue";
                        else
                            "white";
                    }
                    Text {
                        anchors.centerIn: parent
                        text: year
                    }
                }
            }
        }
    }
}
In this exercise you'll create your own data model, AnimalModel, by subclassing QAbstractListModel. You'll get animalmodel.h provided, impelement the functions declared in it in animalmodel.cpp. The activate() function should remove the clicked animal from the list and add it to the top.
Again, this exercise isn't tested. Submit it when you're done.
In this exercise you'll subclass QAbstractTableModel to create an AlbumModel. You get album.h and main.qml provided. Look at them to see what requirements there are for the model. The end result should be a table with the artist name, album name, and star rating that can be changed by clicking.
Again, this exercise isn't tested. Submit it when you're done. Please also remember to leave feedback! Is this type of exercise clear enough to accomplish?
Scene Graph Item
Qt Quick 2 makes use of dedicated scene graph for its rendering. Using a scene graph for graphics rather than the traditional imperative painting systems (QPainter or similar), means the scene to be rendered can be retained between frames and the complete set of primitives to render is known before rendering starts. This means there is room for a number of optimizations, such as batch rendering to minimize state changes and discarding obscured primitives.
For example, say a user-interface contains a list of ten items where each item has a background color, an icon and a text. Using the traditional drawing techniques, this would result in 30 draw calls and a similar amount of state changes. A scene graph, on the other hand, could reorganize the primitives to render such that all backgrounds are drawn in one call, then all icons, then all the text, reducing the total amount of draw calls to only 3. Batching and state change reduction like this can greatly improve performance on some hardware.
The scene graph is closely tied to Qt Quick 2.0 and can not be used stand-alone. The scene graph is managed and rendered by the QQuickWindow class and custom Item types can add their graphical primitives into the scene graph through a call to QQuickItem::updatePaintNode().
Scene Graph Structure
The scene graph is composed of a number of predefined node types, each serving a dedicated purpose. Although we refer to it as a scene graph, a more precise definition is node tree. The tree is built from QQuickItem types in the QML scene and internally the scene is then processed by a renderer which draws the scene. The nodes themselves do not contain any active drawing code nor virtual paint() function.
Nodes
The most important node for users is the QSGGeometryNode. It is used to define custom graphics by defining its geometry and material. The geometry is defined using QSGGeometry and describes the shape or mesh of the graphical primitive. It can be a line, a rectangle, a polygon, many disconnected rectangles, or complex 3D mesh. The material defines how the pixels in this shape are filled.
A node can have any number of children and geometry nodes will be rendered so they appear in child-order with parents behind their children.
Materials
The material describes how the interior of a geometry in a QSGGeometryNode is filled. It encapsulates an OpenGL shader program and provides ample flexibility in what can be achieved, though most of the Qt Quick items themselves only use very basic materials, such as solid color and texture fills.
Available material classes are:
-
QSGFlatColorMaterial- Convenient way of rendering solid colored geometry in the scene graph -
QSGMaterial- Encapsulates rendering state for a shader program -
QSGMaterialShader- Represents an OpenGL shader program in the renderer -
QSGMaterialType- Used as a unique type token in combination withQSGMaterial -
QSGOpaqueTextureMaterial- Convenient way of rendering textured geometry in the scene graph -
QSGSimpleMaterial- Template generated class used to store the state used with aQSGSimpleMateralShader -
QSGSimpleMaterialShader- Convenient way of building custom OpenGL-based materials for the scene graph -
QSGTextureMaterial- Convenient way of rendering textured geometry in the scene graph -
QSGVertexColorMaterial- Convenient way of rendering per-vertex colored geometry in the scene graph
Example
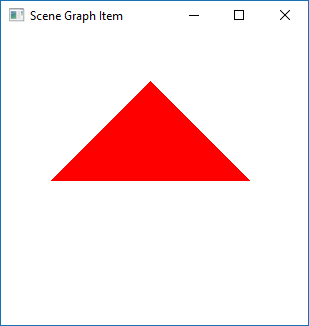
Now, let's look at a simple example where we use Scene Graph Item to draw a triangle.
// triangleitem.h
class TriangleItem : public QQuickItem
{
    Q_OBJECT

public:
    TriangleItem(QQuickItem *parent = nullptr);

protected:
    QSGNode updatePaintNode(QSGNode node, UpdatePaintNodeData *data);

private:
    QSGGeometry m_geometry;
    QSGFlatColorMaterial m_material;
};
// triangleitem.cpp
#include "triangleitem.h"
#include <QSGGeometryNode>

TriangleItem::TriangleItem(QQuickItem *parent)
    : QQuickItem(parent),
      m_geometry(QSGGeometry::defaultAttributes_Point2D(), 3)
{
    setFlag(ItemHasContents);
    m_material.setColor(Qt::red);
}

QSGNode TriangleItem::updatePaintNode(QSGNode n, UpdatePaintNodeData *)
{
    QSGGeometryNode node = dynamic_cast<QSGGeometryNode >(n);
    if (!node) {
        node = new QSGGeometryNode();
    }

    QSGGeometry::Point2D *v = m_geometry.vertexDataAsPoint2D();
    const QRectF rect = boundingRect();
    v[0].x = rect.left();
    v[0].y = rect.bottom();

    v[1].x = rect.left() + rect.width()/2;
    v[1].y = rect.top();

    v[2].x = rect.right();
    v[2].y = rect.bottom();

    node->setGeometry(&m_geometry);
    node->setMaterial(&m_material);

    return node;
}
// main.cpp
...
qmlRegisterType<TriangleItem>("ShapeObjects", 1, 0, "Triangle");
...
import QtQuick 2.9
import QtQuick.Window 2.3
import ShapeObjects 1.0

Window {
    width: 640; height: 480
    visible: true

    Item {
        width: 300; height: 200

        Triangle {
            x: 50; y: 50
            width: 200; height: 100
        }
    }
}
Few important points to notice in the example:
-
We are subclassing
QQuickItemwhich is the base class for all visual items in Qt Quick. -
We are using
QSGGeometryNodeas the node andQSGFlatColorMaterialas the material. -
We are setting the flag
setFlag(ItemHasContents)in the constructor to indicate that the item should be rendered by the scene graph. -
We implement the
updatePaintNodefunction to do the actual painting (Note: It is crucial that OpenGL operations and interaction with the scene graph happens exclusively on the render thread, primarily during theupdatePaintNode()call. The rule of thumb is to only sue classes with tehQSGprefix inside theQQuickItem::updatePaintNode()function)
QML Profiler
Now that the course is drawing to a close, let's talk about something little different. QML Profiler is a tool to find typical performance problems in your applications, such as slowness and unresponsive, stuttering user interfaces. Typical causes include executing too much JavaScript in too few frames. All JavaScript must return before the GUI thread can proceed, and frames are delayed or dropped if the GUI thread is not ready.
Another typical cause for similar performance problems is creating, painting, or updating invisible items, which takes time in the GUI thread.
Triggering long-running C++ functions, such as paint methods and signal handlers, also takes time in the GUI thread, but is more difficult to see in the QML Profiler, because it does not profile C++ code.
To find excessive use of JavaScript, check the frame rate in animations and Scene Graph events, look for gaps, and check whether the application behaves as expected. The JavaScript category displays the run time of functions, which you should try to keep below 16 ms per frame.
To find problems caused by handling invisible items, look for dropped frames and check that you are not using too many short bindings or signal handlers that are updated per frame. You can also visualize Scene Graph overdraw to check scene layout and find items that are never visible to the users, because they are located outside the screen or hidden beneath other, visible elements.
If frames get dropped even though JavaScript is not being run, and there are large, unexplained gaps in the timeline, check your custom QQuickItem implementations. You can use Valgrind or other general purpose profilers to analyze C++ code.
Using QML Profiler
To use QML profiler you need to set up QML debugging for the project if you haven't already (see Setting up QML debugging for more information) and use a kit with Qt version 4.7.4 or later (you should be using Qt 5 for this course anyway, so this shouldn't be an issue).
Select Analyze > QML Profiler in the top menubar of Qt Creator. Start you application and start the data collection with the Start button, and click on Enable Profiling when you're done (do this before you exit the application).
Analyzing Collected Data
Timeline
The Timeline view displays graphical representations of QML and JavaScript execution and a condensed view of all recorded events.
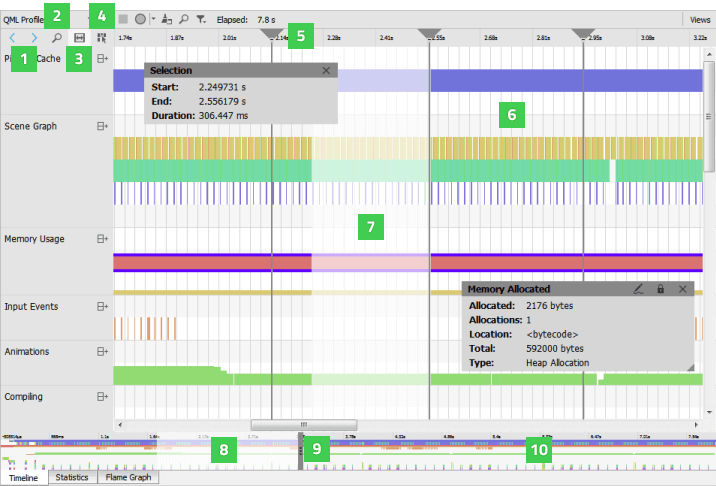
Each row in the timeline (6) describes a type of QML events that were recorded. Move the cursor on an event on a row to see how long it takes and where in the source it is being called. To display the information only when an event is selected, disable the View Event Information on Mouseover button (4).
The outline (10) summarizes the period for which data was collected. Drag the zoom range (8) or click the outline to move on the outline. You can also move between events by selecting the Jump to Previous Event and Jump to Next Event buttons (1).
Select the Show Zoom Slider button (2) to open a slider that you can use to set the zoom level. You can also drag the zoom handles (9). To reset the default zoom level, right-click the timeline to open the context menu, and select Reset Zoom.
Click the time ruler to add vertical orientation lines (5) to the timeline.
Statistics
The Statistics view displays the number of times each binding, create, compile, JavaScript, or signal event is triggered and the average time it takes. This allows you to examine which events you need to optimize. A high number of occurrences might indicate that an event is triggered unnecessarily. To view the median, longest, and shortest time for the occurrences, select Extended Event Statistics in the context menu.
Click on an event to move to it in the source code in the code editor.
Flame Graphs
The Flame Graph view shows a more concise statistical overview of QML and JavaScript execution. In the Visualize Total Time view, the horizontal bars show the amount of time all invocations of a certain function took together, relative to the total runtime of all JavaScript and QML events. The nesting shows which functions were called by which other ones.
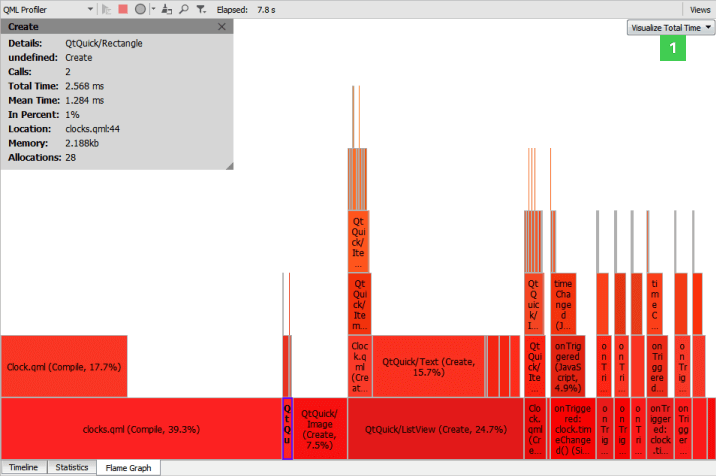
To view the total amount of memory allocated by the functions in the Visualize Memory view, select Memory in the drop-down menu (1).
To view the the number of memory allocations performed by the functions in the Visualize Allocations view, select Allocations in the drop-down menu.
Double-click an item in a view to zoom into it. Double-click an empty area in the view to zoom out again.
Unlike the Timeline view, the Flame Graph view does not show the time spans when no QML or JavaScript is running at all. Thus, it is not suitable for analyzing per frame execution times. However, it is very easy to see the total impact of the various QML and JavaScript events there.
Further reading
To read more extensively on QML Profiler, see documentation.
Exercise for Part 5 - Image Application
This is another peer-reviewed exercise. After you're done, create a repository for your solution on GitHub, and submit it to be peer-reviewed below. Please note that to get the points for this exercise, you're required to review another student's solution! You can download an example solution and do the peer-review after you've submitted your own solution.
Image application allows user to add and capture images for viewing. The application keeps images in memory and does not need to store images persistently. Many building blocks can be re-used from previous exercises and you are welcome to do so, if you wish.
-
The image model must be derived from
QAsbtractListModel. The model stories only image urls, which are used by the application. The model must be implemented in a QML extension plugin and registered as singleton. It may be easier to start with the QML model and then use a C++ model, which is instantiated in the main() function. -
The application itself must use Qt Quick Controls 2 and be based on the
StackView. The main view shows the images from the model. Show image thumbnails e.g. in 100x100 pixel resolution. If the user clicks on the image, show it on the top of the view area in another view. - Add a file dialog to add images to the model.
- Add functionality to use camera to add images to the model.
-
Implement at least three views: the view to show the images (main view), the view to show one image, and a camera view. Add a
ToolBarandToolButtonsto navigate between the views. Push a new view, e.g. a camera view to the stack view and pop it, when the user navigates back to the main view, using tool buttons.