Creating and debugging Qt projects
Hello! Welcome aboard the Qt MOOC!
This topic will cover most of the basic things you should need when working on this course. We will discuss Qt projects in general, and from the perspective of this course in the form of our exercises. We will run through some of the key concepts that will help you understand the fundamentals of Qt. It should also let you get familiar with the official Qt documentation, that we will be using as a study aide alongside the course material. We will also discuss some aspects of builds, qmake, and debugging messages.
If all of this is familiar to you, you may proceed to completing the exercise and moving on to the more specific topics. We won't hold it against you if you come back to read about the basics when you have no idea what's going on after completing yet another Hello World!
Before we start with the heavy lifting, we are going to introduce some basic concepts to help you get started. These are global declarations, modules and namespaces in Qt.
Global Declarations and Macros
Let's talk about the global declarations in Qt. You can find an exhaustive list of global declarations at the Qt documentation.
The global declarations include types, functions and macros. You absolutely do not have to memorize this list before proceeding into the next chapter, but it is important that you know what it is and what you can use it for, as you may find it useful on various occasions while working on this course. In the end of this topic we will discuss some useful debugging functions found in the global declaration.
The type definitions are partly convenience definitions for basic types (some of which guarantee certain bit-sizes on all platforms supported by Qt), partly types related to Qt message handling. The functions are related to generating messages, Qt version handling, and comparing and adjusting object values. And finally, some of the declared macros enable programmers to add compiler or platform specific code to their applications, while others are convenience macros for larger operations.
We will explicitly refer you to the global declarations list in assignments or learning topics where we feel it is necessary.
Qt Modules and Namespaces
Next, let's talk about the modules in Qt. Here is a list of the modules in Qt.
To include modules into your project you need to include them in your projects' .pro file. If you are using qmake, the Core and GUI modules will be included by default. If you aren't using the GUI module in your project (which we for the most parts won't during the beginning, anyway), simply disable it by writing QT -= GUI in your projects .pro file. All of the other Qt modules rely on the Qt Core module.
Next, it's time to take a look at some essentials regarding namespaces and their use in Qt. Here is a list of the main namespaces in Qt. Naturally we will not be using all of these namespaces during the course, but before getting our hands dirty, we believe that you will have some benefit of having been introduced to this list beforehand.
Let's have an example of including namespaces! Say you want to include the QtConcurrent namespace in your code. Let's take a closer look at the documentation page for QtConcurrent:
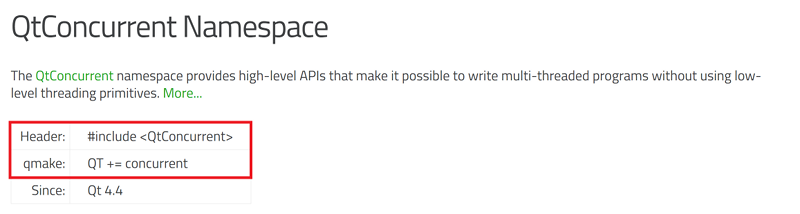
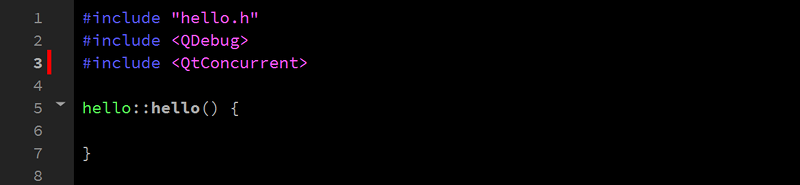
To include the QtConcurrent namespace, you will need to make a specific mention of it in two places: the header of the relevant file (#include <QtConcurrent>),
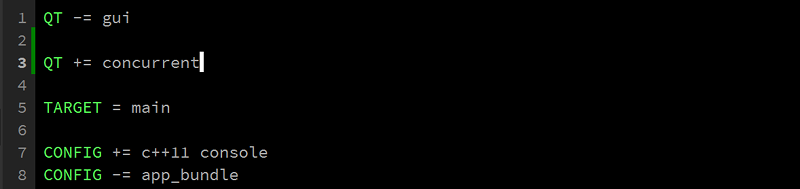
and the project .pro file (QT += concurrent).
Qt Namespace
In the Qt Namespace you can find miscellaneous identifiers used throughout the Qt library. This is the list we are expecting you to memorize before proceeding to the next chapter of this topic.
Just kidding! We're just letting you know it's there if you happen to need to use it as reference material for anything.
Structure of the TMC exercises
Having finished covering the basics, it's time to take a look at the structural composition of the TMC exercises.
Each exercise is located in its own subdirectory in the main exercise directory of each week. The exercise consists of a .pro file at the root level, in addition to a couple of directories.
The .pro file at the root level is the project file for the exercise project. We will further discuss project files later in this chapter. But for now, we will focus on the project structure.
The local tests that will be testing your exercises are located in the test_runner directory.
If you are having problems figuring out why your exercise isn't passing the tests and you have exhausted all other alternatives, it may be worth looking at the test runner files. Figuring out what the tests are testing may give you a clue as to what may be the problem in your code. You may even alter the local tests if it helps you understand the problem better. On a rare occasion, the problem may be that the tests themselves are faulty. In this case we recommend joining the course channel to see if others are having the same problem. We have done everything we can to make sure this does not happen, but there are always edge cases.
Please take note that the local tests are only there to tell you if your exercise is fully completed and ready to be submitted. You cannot alter the tests to your liking, and expect to pass the exercise by submitting an incomplete assignment! We will test your exercise on the server before you receive points for it! Some times there may even be hidden tests serverside, for making sure that you aren't trying to complete the exercises based on what the tests are testing for instead of completing the actual exercise to support your learning.
The src directory is where the magic, by which we mean your coding, will take place.
It includes the relevant source and header files for each exercise project. In some cases there may be additional directories included for libraries, and in some cases we may ask you to create new directories. Nobody knows if! Nobody knows when! Nobody knows how! But we'll figure that out later.
Have you already noticed how every directory has its own .pro file? What does this all mean? It's like trying to figure out the plot line of Lost! The reason for this is, that every subdirectory we have included in the exercise directory are actually projects within the actual exercise project (spoiler: this is also the plot line of Lost)! Let us elaborate and take look at the root level .pro file:
TEMPLATE = subdirs
SUBDIRS += \
      src \
      test_runner

      test_runner.depends = src
This tells qmake, which we will discuss next in this chapter, that the exercise project follows a build template called subdirs, and defines the subdirectories to be included in this project. Using the subdirectories template requires each declared subdirectory to be its own project and have its own project file included in said subdirectory. In the end, we declare the test runner subdirectory to be dependent of the source directory. This is because we want to build your exercise before we build the test runner so the test runner has something to test.
qmake
The qmake tool helps simplify the build process for development projects across different platforms. It automates the generation of Makefiles so that only a few lines of information are needed to create each Makefile. You can use qmake for any software project, whether it is written with Qt or not.
qmake generates a Makefile based on the information in a project file. The project files use the extension .pro, and are usually created by project templates in Qt Creator. Project files are worked on by the developer to specify the instruction set they want qmake to use for their project, and are usually simple. However, more sophisticated project files can be created for complex projects. We will further discuss project files later in this chapter, but as qmake uses the information stored in project files, we cannot completely avoid talking about their contents when talking about qmake.
The fundamental behavior of qmake is influenced by variable declarations that define the build process of each project. Some of these declare resources, such as headers and source files, that are common to each platform. Others are used to customize the behavior of compilers and linkers on specific platforms.
Let us elaborate by once again referring to our exercise structure, specifically the .pro file of the source directory:
QT -= gui

TARGET = main

CONFIG += c++11 console
CONFIG -= app_bundle

win32 {
     CONFIG -= debug_and_release debug_and_release_target
}

DEFINES += QT_DEPRECATED_WARNINGS

SOURCES += \
     main.cpp \
     hello.cpp

 HEADERS += \
      hello.h
You may refer to the exercise directory structure and file composition of exercise 01_HelloWorld. You may also refer to the qmake variable reference and reflect on the declarations in the aforementioned .pro file code. Can you figure out what we are trying to tell qmake and why? The win32 bit may not be entirely self-explanatory.
Platform-specific variables follow the naming pattern of the variables which they extend or modify, but include the name of the relevant platform in their name. For example, LIBS can be used to specify a list of libraries that a project needs to link against. Here is an example:
unix:LIBS += -L/usr/local/lib -lmath
win32:LIBS += c:/mylibs/math.lib
If you feel like doing some exploring on your own, we recommend you take a look at the full list of qmake variables to browse at your own discretion.
.pro files
In a project file, variables are used to hold lists of strings. In the simplest projects, these variables inform qmake about the configuration options to use, or supply filenames and paths to use in the build process.
qmake looks for certain variables in each project file, and it uses the contents of these to determine what it should write to a Makefile. For example, the lists of values in the HEADERS and SOURCES variables are used to tell qmake about header and source files in the same directory as the project file.
As long as you are using qmake, the Core and GUI modules are included by default.
Variables can also be used internally to store temporary lists of values, and existing lists of values can be overwritten or extended with new values.
The following snippet illustrates how lists of values are assigned to variables:
HEADERS = mainwindow.h paintwidget.h
The list of values in a variable is extended in the following way:
SOURCES = main.cpp mainwindow.cpp \
          paintwidget.cpp
CONFIG += console
Note: The first assignment only includes values that are specified on the same line as the HEADERS variable. The second assignment splits the values in the SOURCES variable across lines by using a backslash (\).
Qt resource system
The Qt resource system is a platform independent way to store application resources (images, icons, translation files, data, etc.) inside the application's executable. Resources are specified inside the resource collection .qrc file:
<!DOCTYPE RCC><RCC version="1.0">
<qresource>
    <file>images/icon.png</file>
    <file>data.txt</file>
</qresource>
</RCC>
The file is then included in the .pro file with RESOURCES = application.qrc. The specified files will be then compressed and included as a static C++ array. They can be accessed with QFile or image types like any other file like so:
QIcon icon(":/images/icon.png")
QFile file(":/data.txt");
The QDebug class
The QDebug class provides an output stream for debugging information.
QDebug is used whenever the developer needs to write out debugging or tracing information to a device, file, string or console.
Basic Use
In the common case, it is useful to call the qDebug() function to obtain a default QDebug object to use for writing debugging information.
qDebug() << "Date:" << QDate::currentDate();
qDebug() << "Types:" << QString("String") << QChar('x') << QRect(0, 10, 50, 40);
qDebug() << "Custom coordinate type:" << coordinate;
This constructs a QDebug object using the constructor that accepts a QtMsgType value of QtDebugMsg. Similarly, the qWarning(), qCritical() and qFatal() functions also return QDebug objects for the corresponding message types.
The class also provides several constructors for other situations, including a constructor that accepts a QFile or any other QIODevice subclass that is used to write debugging information to files, sockets, other processes, etc. The constructor that accepts a QString is used to write to a string for display or serialization.
Formatting Options
QDebug formats output so that it's easily readable. It automatically adds spaces between arguments, and adds quotes around QString, QByteArray, QChar arguments.
You can tweak these options through the space(), nospace() and quote(), noquote() methods. Furthermore, QTextStream manipulators can be piped into a QDebug stream.
QDebugStateSaver limits changes to the formatting to the current scope. resetFormat() resets the options to the default ones.
Writing Custom Types to a Stream
Many standard types can be written to QDebug objects, and Qt provides support for most Qt value types. To add support for custom types, you need to implement a streaming operator, as in the following example:
QDebug operator<<(QDebug debug, const Coordinate &c)
{
    QDebugStateSaver saver(debug);
    debug.nospace() << '(' << c.x() << ", " << c.y() << ')';

    return debug;
}
Outputting debug information
qDebug, qWarning, qCritical and qFatal are functions defined in the Qt global declarations. The functions take a format string and a list of arguments, similar to the C printf() function. The format should be a Latin-1 string. To suppress any of these types, you may install your own message handler using qInstallMessageHandler. The functions call the message handler with the defined debug/critical/fatal/warning message. They call the message handler, or if no message handler is present, print out the message to stderr. On Windows, for the most parts, the message is sent to the debugger.
qDebug(const char *message, ...)
Under Windows the message is sent to the console, if it is a console application; otherwise, it is sent to the debugger. This function does nothing if QT_NO_DEBUG_OUTPUT was defined during compilation.
For example:
qDebug("Items in list: %d", myList.size());
If you include QtDebug, a more convenient syntax is also available:
qDebug() << "Brush:" << myQBrush << "Other value:" << i;
With this syntax, the function returns a QDebug object that is configured to use the QtDebugMsg message type. It automatically puts a single space between each item, and outputs a newline at the end. It supports many C++ and Qt types.
Including QtDebug also allows the equivalent syntax to be used with qInfo, qCritical, and qWarning.
qCritical(const char *message, ...)
It exits if the environment variable QT_FATAL_CRITICALS is not empty.
For example:
void load(const QString &fileName)
{
     QFile file(fileName);
     if (!file.exists())
          qCritical("File '%s' does not exist!", qUtf8Printable(fileName));
}
qWarning(const char *message, ...)
This function does nothing if QT_NO_WARNING_OUTPUT was defined during compilation; it exits if at the nth warning corresponding to the counter in environment variable QT_FATAL_WARNINGS. That is, if the environment variable contains the value 1, it will exit on the 1st message; if it contains the value 10, it will exit on the 10th message. Any non-numeric value is equivalent to 1.
For example:
void f(int c)
{
    if (c > 200)
        qWarning("f: bad argument, c == %d", c);
}
qFatal(const char *message, ...)
If you are using the default message handler this function will abort to create a core dump. On Windows, for debug builds, this function will report a _CRT_ERROR enabling you to connect a debugger to the application.
For example:
int divide(int a, int b)
{
    if (b == 0)                                // program error
         qFatal("divide: cannot divide by zero");
    return a / b;
}
Shadow builds
After you've successfully built your first Qt project, you might be interested in the built binaries. By default, Qt Creator builds the project in to a separate directory (`build-ProjectName-*`) as a shadow build, which is separated from the source directory. qmake can also generate an in-source build, but this is not recommended. The benefit in shadow builds is keeping that directory clean, which makes changing between Kits or build configurations faster.
Hey! It's time for our first exercise. It's going to be a simple one, don't worry. Just download the exercise template from TMC, open the project, and head to hello.cpp.
In world() function, write "Hello world" as a qDebug message and "Don't panic!" as a qWarning message.
String handling and value types
In this chapter we're going to discuss strings and their manipulation, and also talk briefly about Value vs Identity type in Qt. There will be some details that are discussed more thoroughly, but in general we'll try to keep to a coherent and concise presentation. If you wish to read up on the more specific techincal details, we encourage you to check the official Qt documentation.
QChar
QChar class provides a 16-bit Unicode character. In Qt, Unicode characters are 16-bit entities without any markup or structure, and this class represents such an entity. It's lightweight, so it can be used everywhere. Most compilers treat it like an usigned short. The class features many functions you'd expect, such as isNull() and isNumber(). If you wish to read more about QChar, see the official documentation.
QString
The QString class provides a Unicode character string. QString stores a string of 16-bit QChars, where each QChar corresponds one Unicode 4.0 character. (Unicode characters with code values above 65535 are stored using surrogate pairs, i.e., two consecutive QChars.)
Behind the scenes, QString uses implicit sharing (copy-on-write) to reduce memory usage and to avoid the needless copying of data. This also helps reduce the inherent overhead of storing 16-bit characters instead of 8-bit characters.
In addition to QString, Qt also provides the QByteArray class to store raw bytes and traditional 8-bit '\0'-terminated strings. For most purposes, QString is the class you want to use. It is used throughout the Qt API, and the Unicode support ensures that your applications will be easy to translate if you want to expand your application's market at some point. The two main cases where QByteArray is appropriate are when you need to store raw binary data, and when memory conservation is critical (like in embedded systems).
Initializing a String
One way to initialize a QString is simply to pass a const char * to its constructor. For example, the following code creates a QString of size 5 containing the data "Hello":
QString str = "Hello";
Other ways exist too, such as providing the string data as an array of QChars.
Another approach is to set the size of the string using resize(), and to initialize the data character per character using the [] operator, e.g. str[2] = QChar('A'). After a call to the resize() function, the newly allocated characters have undefined values. To set all the characters in the string to a particular value, use the fill() function.
For read-only access, an alternative syntax is to use the at() function. The at() function can be faster than operator[](), because it never causes a deep copy to occur.
QString provides dozens of overloads designed to simplify string usage. For example, if you want to compare a QString with a string literal, you can write code like this and it will work as expected:
QString str;
if (str == "auto" || str == "extern" || str == "static" || str == "register") {
    // ...
}
You can also pass string literals to functions that take QStrings as arguments, invoking the QString(const char *) constructor.
Manipulating String Data
QString provides the following basic functions for modifying the character data: append(), prepend(), insert(), replace(), and remove(). For example:
QString str = "and";
str.prepend("rock "); // str == "rock and"
str.append(" roll"); // str == "rock and roll"
str.replace(5, 3, "&"); // str == "rock & roll"
If you are building a QString gradually and know in advance approximately how many characters the QString will contain, you can call reserve(), asking QString to preallocate a certain amount of memory. You can also call capacity() to find out how much memory QString actually allocated.
A frequent requirement is to remove whitespace characters from a string ('\n', '\t', ' ', etc.). If you want to remove whitespace from both ends of a QString, use the trimmed() function. If you want to remove whitespace from both ends and replace multiple consecutive whitespaces with a single space character within the string, use simplified().
indexOf() and lastIndexOf() functions return the first index position of the character or substring they find, former going forward from given position, and latter backwards; if none is found they return -1.
Lists of strings are handled by the QStringList class. You can split a string into a list of strings using the split() function, and join a list of strings into a single string with an optional separator using QStringList::join(). You can obtain a list of strings from a string list that contain a particular substring or that match a particular QRegExp using the QStringList::filter() function.
Conversions
QString provides the following three functions that return a const char * version of the string as QByteArray: toUtf8(), toLatin1(), and toLocal8Bit(). Corresponding functions to convert from these encodings are fromLatin1(), fromUtf8(), and fromLocal8Bit(). Other encodings are supported through the QTextCodec class.
QTextCodec
Qt uses Unicode to store, draw and manipulate strings. In many situations you may wish to deal with data that uses a different encoding. For example, most Japanese documents are still stored in Shift-JIS or ISO 2022-JP, while Russian users often have their documents in KOI8-R or Windows-1251. The QTextCodec class provides conversions between text encodings. We aren't diving into different encodings on this course, but if you're interested in learning about it, please visit QTextCodec documentation.
Distinction Between Null and Empty Strings
For historical reasons, QString distinguishes between a null string and an empty string. A null string is a string that is initialized using QString's default constructor or by passing const char * 0 to the constructor. An empty string is any string with size 0. Thus, null string is always empty, but an empty string isn't necessarily null (e.g. QString() is both null and empty, QString("") is empty, but not null).
All functions except isNull() treat null strings the same as empty strings. For example, toUtf8().constData() returns a pointer to a '\0' character for a null string (not a null pointer), and QString() compares equal to QString(""). We recommend that you always use the isEmpty() function and avoid isNull().
More Efficient String Construction
Many strings are known at compile time. But the trivial constructor QString("Hello"), will copy the contents of the string, treating the contents as Latin-1. To avoid this one can use the QStringLiteral macro to directly create the required data at compile time. Constructing a QString out of the literal does then not cause any overhead at runtime.
A slightly less efficient way is to use QLatin1String. This class wraps a C string literal, precalculates it length at compile time and can then be used for faster comparison with QStrings and conversion to QStrings than a regular C string literal.
Using the QString '+' operator, it is easy to construct a complex string from multiple substrings. You will often write code like this:
QString foo;
QString type = "long";

foo->setText(QLatin1String("vector<") + type + QLatin1String(">::iterator"));

if (foo.startsWith("(" + type + ") 0x"))
    ...
There is nothing wrong with either of these string constructions, but there are a few hidden inefficiencies.
First, multiple uses of the '+' operator usually means multiple memory allocations. When concatenating n substrings, where n > 2, there can be as many as n - 1 calls to the memory allocator.
An internal template class QStringBuilder can be used along with a few helper functions. This class is marked internal and does not appear in the documentation, because you aren't meant to instantiate it in your code. Its use will be automatic, as described below. The class is found in src/corelib/tools/qstringbuilder.cpp if you want to have a look at it.
QStringBuilder uses expression templates and reimplements the '%' operator so that when you use '%' for string concatenation instead of '+', multiple substring concatenations will be postponed until the final result is about to be assigned to a QString. At this point, the amount of memory required for the final result is known. The memory allocator is then called once to get the required space, and the substrings are copied into it one by one.
There are two ways you can access this improved method of string construction. The straightforward way is to include QStringBuilder wherever you want to use it, and use the '%' operator instead of '+' when concatenating strings:
#include <QStringBuilder>

QString hello("hello");
QStringRef el(&hello, 2, 3);
QLatin1String world("world");
QString message =  hello % el % world % QChar('!');
A more global approach which is the most convenient, but not entirely source compatible, is to define this in your .pro file:
DEFINES *= QT_USE_QSTRINGBUILDER
and the '+' will automatically be performed as the QStringBuilder '%' everywhere.
In this exercise you will implement several functions that handle strings. You'll find the exercise instructions in the exercise template, in the file strings.cpp.
QByteArray
The QByteArray class provides an array of bytes.
QByteArray can be used to store both raw bytes and traditional 8-bit '\0'-terminated strings. Using QByteArray is often much more convenient than using const char *. Behind the scenes, it always ensures that the data is followed by a '\0' terminator, and uses implicit sharing (copy-on-write) to reduce memory usage and avoid needless copying of data.
One way to initialize a QByteArray is simply to pass a const char * to its constructor. For example, the following code creates a byte array of size 5 containing the data "Hello":
QByteArray ba("Hello");
Although the size() is 5, the byte array also maintains an extra '\0' character at the end so that if a function is used that asks for a pointer to the underlying data (e.g. a call to data()), the data pointed to is guaranteed to be '\0'-terminated.
A QByteArray can embed '\0' bytes. The size() function always returns the size of the whole array, including embedded '\0' bytes, but excluding the terminating '\0' added by QByteArray. If you want to obtain the length of the data up to and excluding the first '\0' character, call qstrlen() on the byte array.
As with QString you can also set the size of the array using resize() and then initialize the data byte per byte using operator[]().
To obtain a pointer to the actual character data, call data() or constData(). These functions return a pointer to the beginning of the data. The pointer is guaranteed to remain valid until a non-const function is called on the QByteArray.
QByteArray provides the same functions for modifying and searching the byte data as QString, such as append() and indexOf().
Functions that perform conversions between numeric data types and strings are performed in the C locale, irrespective of the user's locale settings. Use QString to perform locale-aware conversions between numbers and strings.
In QByteArray, the notion of uppercase and lowercase and of which character is greater than or less than another character is locale dependent. This affects functions that support a case insensitive option, or that compare, or lowercase or uppercase their arguments. Case insensitive operations and comparisons will be accurate if both strings contain only ASCII characters. (If $LC_CTYPE is set, most Unix systems do "the right thing".) This issue does not apply to QStrings since they represent characters using Unicode.
In this exercise you get to think a bit about bytes (Note: Laughing at bad puns is healthy for you). Exercise instructions can be found in the template as usual, in the file bytes.cpp.
Value Type vs Identity Type
Let's talk shortly about Value vs Identity type in Qt. All the objects discussed in this chapter, such as QString, are value types, meaning that they can be copied. Later on in the course we will be going into Qt Objects which are identity types. The difference here is that where values are assigned and copied, identities are cloned. Cloning means to create a new identity, not an exact copy of the old one. If you wish to learn more about the reasoning behind this, see documentation.
QVariant
Later in the course we will be using QVariant, so we'll talk about it here briefly.
The QVariant class acts like a union for the most common Qt data types, specifically value types. Because C++ forbids unions from including types that have non-default constructors or destructors, most interesting Qt classes cannot be used in unions. QVariant solves this problem.
A QVariant object holds a single value of a single type() at a time. (Some type()s are multi-valued, for example a string list.) You can find out what type, T, the variant holds, convert it to a different type using convert(), get its value using one of the toT() functions (e.g., toSize()) and check whether the type can be converted to a particular type using canConvert(). See QVariant documentation for further details.
Item Containers
Qt Containers
The Qt library provides a set of general purpose template-based container classes. These classes can be used to store items of a specified type. For example, if you need a resizable array of QStrings, use QVector<QString>.
These container classes are designed to be lighter, safer, and easier to use than the STL containers. If you are unfamiliar with the STL, or prefer to do things the "Qt way", you can use these classes instead of the STL classes. However, it's completely fine to use standard containers as well.
The Qt container classes are implicitly shared, they are reentrant, and they are optimized for speed, low memory consumption, and minimal inline code expansion, resulting in smaller executables. In addition, they are thread-safe in situations where they are used as read-only containers by all threads used to access them.
For traversing the items stored in a container, you can use one of two types of iterators: Java-style iterators and STL-style iterators. The Java-style iterators are easier to use and provide high-level functionality, whereas the STL-style iterators are slightly more efficient and can be used together with Qt's and STL's generic algorithms.
Qt also offers a foreach keyword that make it very easy to iterate over all the items stored in a container.
Container classes
Qt provides the following sequential containers: QList, QLinkedList, QVector, QStack, and QQueue. For most applications, QVector is the best type to use unless you have a specific need for the other ones.
Qt also provides these associative containers: QMap, QMultiMap, QHash, QMultiHash, and QSet. The "Multi" containers conveniently support multiple values associated with a single key. The "Hash" containers provide faster lookup by using a hash function instead of a binary search on a sorted set.
As special cases, the QCache and QContiguousCache classes provide efficient hash-lookup of objects in a limited cache storage.
Containers can be nested. For example, it is perfectly possible to use a QMap<QString, QList<int>>, where the key type is QString and the value type QList<int>.
The containers are defined in individual header files with the same name as the container (e.g., <QLinkedList>). For convenience, the containers are forward declared in <QtContainerFwd>.
The values stored in the various containers can be of any assignable data type. To qualify, a type must provide a default constructor, a copy constructor, and an assignment operator. This covers most data types you are likely to want to store in a container, including basic types such as int and double, pointer types, and Qt data types such as QString, QDate, and QTime, but it doesn't cover QObject or any QObject subclass (QWidget, QDialog, QTimer, etc.). If you attempt to instantiate a QList<QWidget>, the compiler will complain that QWidget's copy constructor and assignment operators are disabled. If you want to store these kinds of objects in a container, store them as pointers, for example as QList<QWidget *>.
Here's an example custom data type that meets the requirement of an assignable data type:
class Employee
{
public:
     Employee() {}
     Employee(const Employee &other);

     Employee &operator=(const Employee &other);

 private:
      QString myName;
      QDate myDateOfBirth;
};
If we don't provide a copy constructor or an assignment operator, C++ provides a default implementation that performs a member-by-member copy. In the example above, that would have been sufficient. Also, if you don't provide any constructors, C++ provides a default constructor that initializes its member using default constructors. Although it doesn't provide any explicit constructors or assignment operator, the following data type can be stored in a container:
struct Movie
{
    int id;
    QString title;
    QDate releaseDate;
};
Some containers have additional requirements for the data types they can store. For example, the Key type of a QMap<Key, T> must provide operator<(). Such special requirements are documented in a class's detailed description. In some cases, specific functions have special requirements; these are described on a per-function basis. The compiler will always emit an error if a requirement isn't met.
Qt's containers provide operator<<() and operator>>() so that they can easily be read and written using a QDataStream. This means that the data types stored in the container must also support operator<<() and operator>>(). Providing such support is straightforward; here's how we could do it for the Movie struct above:
QDataStream &operator<<(QDataStream &out, const Movie &movie)
{
    out << (quint32)movie.id << movie.title
        << movie.releaseDate;
    return out;
}

QDataStream &operator>>(QDataStream &in, Movie &movie)
{
    quint32 id;
    QDate date;

    in >> id >> movie.title >> date;
    movie.id = (int)id;
    movie.releaseDate = date;
    return in;
}
The documentation of certain container class functions refer to default-constructed values; for example, QVector automatically initializes its items with default-constructed values, and QMap::value() returns a default-constructed value if the specified key isn't in the map. For most value types, this simply means that a value is created using the default constructor (e.g. an empty string for QString). But for primitive types like int and double, as well as for pointer types, the C++ language doesn't specify any initialization; in those cases, Qt's containers automatically initialize the value to 0.
Iterating correctly and efficiently
Iterators provide a uniform means to access items in a container. Qt's container classes provide two types of iterators: Java-style iterators and STL-style iterators.
Non-mutable iterating can be done with a simple range loop for (const ¬eConstRefToMyItem : container).
The Java-style iterators were introduced in Qt 4. In some ways they are more convenient to use than the STL-style iterators, at the price of being slightly less efficient. Their API is modelled on Java's iterator classes.
In general we don't recommend using the normal Java-style iterators, though you may if you wish. For mutable iterating, the Java-style mutable iterators are arguably easiest to use.
Example of QMutableListIterator:
QMutableListIterator<int> i(list);
while (i.hasNext()) {
    if (i.next() % 2 != 0)
        i.remove();
}
The code removes all odd numbers from the list.
The next() call in the loop is made every time. It jumps over the next item in the list. The remove() function removes the last item that we jumped over from the list. The call to remove() does not invalidate the iterator, so it is safe to continue using it.
If we just want to modify the value of an existing item, we can use setValue(). In the code below, we replace any value larger than 128 with 128:
QMutableListIterator<int> i(list);
while (i.hasNext()) {
    if (i.next() > 128)
        i.setValue(128);
}
Iterators for associative containers work slightly differently, but the idea is the same. The official documentation goes over different iterators in depth, and includes multiple examples as well.
In this exercise you'll get familiar with QVector and QMap, exercise instructions can be found in containers.cpp.
Algorithms in container manipulation
If you are interested in learning about algorithmic complexities of Qt Containers and data types please check out the documentation here. In many ways it is good to understand why certain containers are better for some things than others, and in some applications even focusing on most efficient growth strategies, but it's past the goal of this course to go through them here.