Object-Oriented Programming with Java, part I
 This material is licensed under the Creative Commons BY-NC-SA license, which means that you can use it and distribute it freely so long as you do not erase the names of the original authors. If you do changes in the material and want to distribute this altered version of the material, you have to license it with a similar free license. The use of the material for commercial use is prohibited without a separate agreement.
Methods and copying parameters
Let us focus on a couple of details concerning methods.
In section 15 was an example, in which we tried to change the value of a main program variable inside a method.
public static void main(String[] args) {
    int number = 1;
    addThree();
    System.out.println("Main program variable number holds the value: " + number);
}

public static void addThree() {
    number = number + 3;
}
This program of ours does not work. The reason is that the method cannot access the main program variable
number.
This is because main program variables are not visible to methods. More generally: no method
variable is visible to other methods. As the main program main is also a method, this constraint
holds for the main program as well. The only way to give information to a method is through
parameters.
Let us try to fix the above example by passing the main program variable number to the
method as a parameter.
public static void main(String[] args) {
    int number = 1;
    addThree(number);
    System.out.println(number);  // prints 1, the value did not change
}

public static addThree(int number) {
    number = number + 3;
}
Still, the program does not function the way we want. The method parameters are different variables than
the ones introduced in the main program. In the previous example, the method increments a variable with
the same name as the main program variable. The parameter has the same name, but is not the same as the
main program variable number.
When a parameter is given to a method, the value of the parameter is copied into a new
variable and that new variable is the one the method uses. In the example above, the variable
number that was given to the method addThree as a parameter, will be copied
and then the copy is actually handed out for the method to use. The method uses a copy of the
variable from the main program, not the original variable. The main program variable
number stays unchanged.
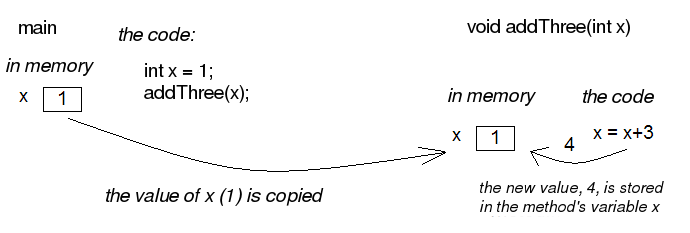
We can imagine that the main program method main and the method addThree
both work in their own parts of the computer memory. In the picture below, there is a "box"
for the value of the variable number of the main method. When the method is called, a new
"box" named number will be created and the main value of the method variable
number will be copied into it. In this example, the number is 1. Both variables
that are called number are separate, therefore when the method addThree
changes the value of its own variable called number it does not affect the variable
number in the main program.
The picture below will demonstrate what happens.
The method can still naturally pass information to the caller, which happens by using a return value
(i.e. using a return command to return a variable with a value). We can get the previous
example to work by changing the code a little bit:
public static void main(String[] args) {
    int number = 1;
    number = addThreeAndReturn(number);

    System.out.println(number);  // prints 4, because number has the method return value as its value
}

public static int addThreeAndReturn(int number) {
    number = number + 3;

    return number;
}
The method still uses the copy of the main program variable number. In the main program,
we assign the variable number the method return value as a new value, so that we can get
the change to take effect in the main program. Note that the name of the method variable plays no role
here. The code works exactly the same regardless of the variable names. Here follows an example:
public static void main(String[] args) {
    int number = 1;
    number = addThreeAndReturn(number);

    System.out.println(number);
}

public static int addThreeAndReturn(int incremented) {
    incremented = incremented + 3;

    return incremented;
}
We have now found out that the parameters in methods are different variables than the variables introduced in the method call. Only the parameter value gets copied from the caller to the method.
Unfortunately this is not the whole story. If a method gets an ArrayList as a parameter, the
method sees the original list and all the changes the method makes will take effect everywhere.
public static void removeFirst(ArrayList<Integer> list) {
    list.remove(0); // removes the number from index 0
}
public static void main(String[] args) {
    ArrayList<Integer> numbers = new ArrayList<Integer>();
    numbers.add(4);
    numbers.add(3);
    numbers.add(7);
    numbers.add(3);

    System.out.println(numbers); // prints [4,3,7,3]

    removeFirst(numbers);

    System.out.println(numbers); // prints [3,7,3]
}
Unlike a parameter of int type, a list will not be copied and therefore the method
makes changes to the original list given as a parameter.
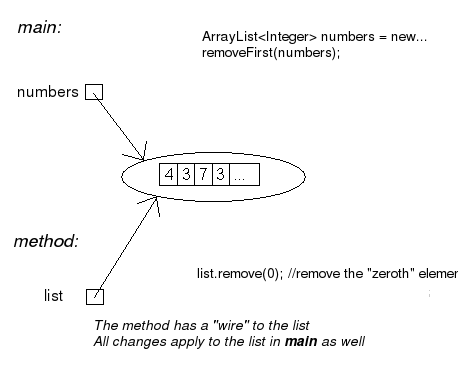
The picture below will clarify the example. ArrayList does not live in an imagined
"box" like an int. The variable name in the example numbers is only
a reference that refers to the place where the ArrayList is. One way to visualize this is that
an ArrayList is connected with a wire. The name of the ArrayList is a
"wire", and the list itself is located "at the other end of the wire". When we give
the ArrayList to a method as a parameter, we actually give the method a wire. When the
method uses its parameter, it finds the original list at the other end of this wire. Actually the main program
and the method do have separate wires, but both wires have the same original list at the end of them
and all the changes will be made directly to the original list. During and after this week we will find
out that many things in Java are "connected with a wire".
Note that again the parameter name inside the method can be anything. It does not need to be the
same as the name in the main program (or other method that calls it). In the example above, the method
uses the name list but the method caller sees the same list with a different name:
numbers.
Now, you probably start to wonder why does the value of the parameter get copied and the original variable stay intact when the
parameter is of int type, but the original list is given to the method when the parameter
is of ArrayList type? In Java only the values of primitive data
types (which are int, double, char,
boolean and a couple of others that we have not yet discussed) get copied to the method.
When the method parameters are of other types only the references are copied to the method. A
reference is like a "wire", therefore the method can access the list using it directly. The
variables that are not of primitive data types are of reference data types
and are "wired" just like the ArrayList in the previous example. The method is given the
wire and the method can access the parameter directly.
Combining ArrayLists
Create the method public static void combine(ArrayList<Integer> first,
ArrayList<Integer> second) that inserts the items in a list called
second to a list called first. The order of the items can be
anything and the same item can appear in the list more than once. An example on using the
method:
ArrayList<Integer> list1 = new ArrayList<Integer>();
ArrayList<Integer> list2 = new ArrayList<Integer>();

list1.add(4);
list1.add(3);

list2.add(5);
list2.add(10);
list2.add(7);

combine(list1, list2);

System.out.println(list1); // prints [4, 3, 5, 10, 7]

System.out.println(list2); // prints [5, 10, 7]
We can use the method addAll provided by the ArrayList class to add one list in
another list. The list gets the other list, whose items are to be added, as a parameter.
Smart combining
Create the method smartCombine that works like the previous
combine method except that numbers can be on the list only once. This means that the method
adds a new number to the list only if the list does not already contain that number. You might
find the method contains from the ArrayList class useful. You can use that method
to check if a number is in the list.
Instructions on code-writing and problem solving
Two of the leading software developers, Martin Fowler and Kent Beck have said in the book Refactoring: Improving the Design of Existing Code that:
- Fowler: "Any fool can write code that a computer can understand. Good programmers write code that humans can understand."
- Beck: "I'm not a great programmer, I'm just good a programmer with great habits."
[Update: previously both quotes were credited to Kent Beck. Our thanks go to Esko Luontola for pointing out this mistake]:
We are now taking the first steps towards becoming good programmers.
Well indented and "breathing" code
Let us take a look at a code that first adds numbers to a list and then prints the items fo the list. Then all instances of a certain number are removed from the list and the list gets printed.
First, we write the code badly and without indentations:
public static void main(String[] args) {
ArrayList<Integer> numbers = new ArrayList<Integer>();
numbers.add(4);
numbers.add(3);
numbers.add(7);
numbers.add(3);
System.out.println("The numbers in the beginning:");
for (int number : numbers) {
System.out.println(number);
}
while (numbers.contains(Integer.valueOf(3))) {
numbers.remove(Integer.valueOf(3));
}
System.out.println("The numbers after removal:");
for (int number : numbers) {
System.out.println(number);
}
Even though the unindented code works, it is unpleasant to read. Let us indent the code (you can get NetBeans to auto-indent your code by pressing Alt+Shift+F) and separate logical parts with line breaks:
public static void main(String[] args) {
    ArrayList<Integer> numbers = new ArrayList<Integer>();
    numbers.add(4);
    numbers.add(3);
    numbers.add(7);
    numbers.add(3);

    System.out.println("The numbers in the beginning:");

    // here we print numbers
    for (int number : numbers) {
        System.out.println(number);
    }

    // checks if the list contains the number 3
    while (numbers.contains(Integer.valueOf(3))) {
        numbers.remove(Integer.valueOf(3));  // if yes, it is removed
    }
    // we use a while structure to get all the threes removed!

    System.out.println("The numbers after removal:");

     // here we print numbers
    for (int number : numbers) {
        System.out.println(number);
    }
}
Now, the code starts to make sense. For example, the printing and the number removal are two logical parts, therefore they are separated with line breaks. The code is airy and reading the code is much more pleasant.
There are even comments in the code to help the reader understand what happens and where!
Getting rid of copy-paste with methods
What could be called the Original sin of a programmer is to create copy-paste code. This means using the same code in multiple places by copy-pasting it around the source code. In our example, the printing of the list is done twice. The code that handles the printing part should be separated as its own method. Then the printing method should be called from the main program:
public static void main(String[] args) {
    ArrayList<Integer> numbers = new ArrayList<Integer>();
    numbers.add(4);
    numbers.add(3);
    numbers.add(7);
    numbers.add(3);

    System.out.println("The numbers in the beginning:");

    // here we print numbers
    print(numbers);

    while (numbers.contains(Integer.valueOf(3))) {
        numbers.remove(Integer.valueOf(3));
    }

    System.out.println("The numbers after removal:");

    // here we print numbers
    print(numbers);
}

public static void print(ArrayList<Integer> numbers) {
    for (int number : numbers) {
        System.out.println( number );
    }
}
Slicing separate tasks into methods with descriptive names
Now, the code has become even more easy to read. A distinctively separate entity, the printing of the list is now a method that is easy to understand. By defining a new method the readability of the main program has improved. Pay attention to the descriptive name of the method: the name describes exactly what the method does. Next, we can remove the advising comments here we print numbers , because the name of the method speaks for itself.
There is still room for improvements in writing the program. The main program still looks a bit messy, since there is an "unaesthetic" code line that directly manipulates the list, in between the neat method calls. Let us turn that unaesthetic piece of code into a method:
public static void main(String[] args) {
    ArrayList<Integer> numbers = new ArrayList<Integer>();
    numbers.add(4);
    numbers.add(3);
    numbers.add(7);
    numbers.add(3);

    System.out.println("The numbers in the beginning:");
    print(numbers);

    remove(numbers, 3);

    System.out.println("The numbers after removal:");
    print(numbers);
}

public static void print(ArrayList<Integer> numbers) {
    for (int number : numbers) {
        System.out.println( number );
    }
}

public static void remove(ArrayList<Integer> numbers, int removed) {
    while (numbers.contains(Integer.valueOf(removed))) {
        numbers.remove(Integer.valueOf(removed));
    }
}
In the example above, we created a new descriptively named method out of a separate logical entity, i.e. removing all the instances of a certain number. The resulting main program is now very understandable - almost like natural language. Both methods are very simple and easy to understand as well.
Kent Beck might be proud of what we have accomplished! The code is easy to understand, easy to modify and does not include any copy-paste.
Object-oriented programming
Before we begin, here is a small introduction to object-oriented programming.
In procedural programming - which is the way of programming we have been studying so far - a program is divided in to smaller parts, methods. A method works as a separate part of a program and it can be called from anywhere in the program. When a method is called, execution of the program moves to the beginning of the called method. After the execution of the method is done, the program will continue from where the method was called.
In object oriented programming, just like in procedural programming, we attempt to divide a program into smaller parts. In object-oriented programming the small parts are objects. Each separate object has its own individual responsibility; an object contains a related group of information and functionality. Object-oriented programs consist of multiple objects which together define how the program works.
Object
We have already used many of the ready-made objects in Java. For example, ArrayLists
are objects. Each separate list consists of information related to it; that is, the state of the
object. Functionality is also contained in the ArrayList objects: the methods by which the state of the
object can be altered. As an example, there are two ArrayList objects in the following piece of code,
cities and countries :
public static void main(String[] args) {
    ArrayList<String> cities = new ArrayList<String>();
    ArrayList<String> countries = new ArrayList<String>();

    countries.add("Finland");
    countries.add("Germany");
    countries.add("Netherlands");

    cities.add("Berliini");
    cities.add("Nijmegen");
    cities.add("Turku");
    cities.add("Helsinki");

    System.out.println("number of countries " + countries.size() );
    System.out.println("number of cities " + cities.size() );
}
Both the countries object and the cities object live a life of their own.
The state of each is not related to the state of the other. For example, the state of the
countries object consists of the Strings "Finland", "Germany" and
"Netherlands" that are in the list, probably also the information of how many countries are
in the list.
When doing a method call related to an object (for example,
countries.add("Finland");), the name of the object whose method is being called
goes to the left side of the period sign (dot), and to the right side goes the name of the method itself. When
asking how many Strings the countries list contains, we call countries.size(). We are
calling the method size of the object countries. What the method returns
depends on the state of the object in question, other objects do not affect the execution of the
method in any way.
We have used the command new many times already. For example, creation of a list
(ArrayList) and creation of a reader (Scanner) have been done using the
command new. The reason is that both of these are classes from which the object
is created. In Java, objects are always created with new, except in a few cases.
One of the cases where you do not always need to use new is in the construction of
Strings. The familiar way to create a String is actually an abbreviated way of using new.
A String can also be created with new just like any other object:
String text = "some text";       // abbreviated way of creating a String
String anotherText = new String("more text");
Cases in which ready-made parts of Java call new out of sight of the programmer also
exist.
Class
It is clear that all objects are not similar to one another. For example, ArrayList
objects differ drastically from String objects. All ArrayLists have the same
methods add, contains, remove, size, ... and
respectively all String objects have the same methods (substring,
length, charAt, ...). Arraylist and String objects do not have the same
methods because they are different types of objects.
The type of a certain group of objects is called a class. ArrayList is
a class, as are String, Scanner, and so forth. Objects, on the other hand, are
instances of classes.
Objects of the same class all have the same methods and a similar state. For example, the state of
an ArrayList object consists of elements inserted to the list while the state of a
String object consists of a string of characters.
A class and its objects
A class defines what kind of objects it has:
- what methods the objects have
- what the state of the objects are, or in other words, what kind of attributes the objects have
A class describes the "blueprint" of the objects that are made out of it (are instances of it).
Lets take an analogy from the world outside of computers: the blueprints of a house. The blueprints define how the building is to be built and in that way dictate the shape and size of it. The blueprints are the class, they define the general characteristics of the objects created out of that class:

Individual objects, the houses in our analogy, are made from that same blueprint. They are instances of the same class. The state of individual objects, the attributes, can vary (color of walls, building material of the roof, doors, windowsills, etc...). Here is one instance of a House object:

An object is always created from its class by calling the method - the constructor - that
creates the object with the command new. For example, a new instance is created from the
class Scanner by calling new Scanner(..):
Scanner reader = new Scanner(System.in);
Constructors take parameters the way any other method does.
Accounts
You are handed a ready-made class Account along with your exercise files. The object
of the class Account represents a bank account that has a balance (meaning some
amount of money). The accounts are used as follows:
Account bartosAccount = new Account("Barto's account",100.00);
Account bartosSwissAccount = new Account("Barto's account in Switzerland",1000000.00);

System.out.println("Initial state");
System.out.println(bartosAccount);
System.out.println(bartosSwissAccount);

bartosAccount.withdrawal(20);
System.out.println("Barto's account balance is now: "+bartosAccount.balance());
bartosSwissAccount.deposit(200);
System.out.println("Barto's Swiss account balance is now: "+bartosSwissAccount.balance());

System.out.println("Final state");
System.out.println(bartosAccount);
System.out.println(bartosSwissAccount);
Your first account
Note: there is a different exercise template for each of the sub-exercises. For this exercise use the template 072.1
Create a program that creates an account with the balance of 100.0, deposits 20.0 and prints the account. Note! do all the steps described in the exercise exactly in the described order!
Your first money transfer
Note: there is a different exercise template for each of the sub-exercises. For this exercise use the template 072.2
Create a program that:
- Creates an account named
"Matt's account"with the balance of 1000 - Creates an account named
"My account"with the balance of 0 - Withdraws 100.0 from Matt's account
- Deposits 100.0 to My account
- Prints both accounts
Money transfers
Note: there is a different exercise template for each of the sub-exercises. For this exercise use the template 072.3
In the above program, you made a money transfer from one person to another. Let us next create a method that does the same!
Create the method public static void transfer(Account from, Account to, double
howMuch) in the given program body. The method transfers money from one account to
another. You do not need to check that the from account has enough balance.
After completing the above, make sure that your main method does the following:
- Creates an account
"A"with the balance of 100.0 - Creates an account
"B"with the balance of 0.0 - Creates an account
"C"with the balance of 0.0 - Transfers 50.0 from account A to account B
- Transfers 25.0 from account B to account C
Defining your own class - object variables
A class is defined to serve some meaningful whole. Often a "meaningful whole" represents
something from the real world. If a computer program needs to handle personal data it could be sensible
to define a separate class Person which then holds methods and attributes related to an
individual.
Let us go ahead and assume that we have a project frame with an empty main program:
public class Main {

    public static void main(String[] args) {
    }

}
We will create a new class in our project. In NetBeans, this can be done in projects on the left, from the right click menu select new, java class. We will name the class in the dialog that pops up.
Just as with variables and methods, the name of the class should always be as descriptive as possible. Sometimes as a project progresses a class might transform into something different in order meet the programmer's needs. In situations like this, it is possible to rename your class with ease (see the NetBeans guide).
Let us create a class named Person. The class will exist in its own
Person.java file. Since the main program is in its own file the program now consists of
two files in total. At first the class will be empty:
public class Person {

}
The class has to define what methods and attributes the objects created from the class will have. Let us decide that each person has a name and an age. It feels natural to represent the name as a String and the age as an integer. Let us add this to our schematics:
public class Person {
    private String name;
    private int age;
}
Above, we defined that all instances created from the Person class have a name and an
age. Defining attributes is done in a quite similar fashion as with normal variables. In this case
though, there is the keyword private in front. This keyword means that name
and age will not show outside of the object, but are instead hidden within it. Hiding
things within an object is called encapsulation.
Variables defined within a class are called object variables, object fields or object attributes. A beloved child has many names.
So, we have defined the schematics -- the class -- for the person object. All person objects have
the variables name and age. The 'state' of the objects is determined
by the values that have been set to its variables.
Defining your own class - constructor, or "formatting the state"
When an object is created its starting state is defined at the same time. Self-defined objects are
created for the most part in the same way as ready-made objects (ArrayList objects for example)
are created. Objects are created with the new command. When creating an object it would be
handy to be able to set the values of some of the variables of that object.
    public static void main(String[] args) {
        Person bob = new Person("Bob");
        // ...
    }
This can be achieved by defining the method that creates the object, the constructor. The
constructor for the Person class that creates a new Person object has been
defined in the following example. In the constructor, the person that is being created gets 0 as her age and her
name is received from the parameter of the constructor.
public class Person {
    private String name;
    private int age;

    public Person(String initialName) {
        this.age = 0;
        this.name = initialName;
    }
}
The constructor always has the same name as the class. In the code above, the class is
Person and the constructor is public Person(String initialName). The value
the constructor receives as a parameter is in parentheses after the name of the constructor. You can
imagine the constructor as a method that Java runs when an object is created with the command new
Person("Bob"); Whenever an object is created from a class, the constructor of that
class is called.
A few notes: within the constructor there is a command this.age = 0. Through it, we set
a value for this particular object; we define the internal variable age of "this" object. Another
command we use is this.name = initialName;. Again, we give the internal variable called name the String
that is defined in the constructor. The variables age and name are automatically visible in the
constructor and elsewhere in the object. They are referred to with the this
prefix. Due to the private modifier, the variables cannot be seen from outside the
object.
One more thing: if the programmer does not create a constructor for her class, Java will automatically create a default constructor for it. A default constructor is a constructor that does nothing. So, if you for some reason do not need a constructor you do not need to write one.
Class definition - methods
We already know how to create and initialize objects. However, objects are useless if they cannot do
anything. Therefore, objects should have methods. Let us add to the Person class a method that prints
the object on the screen:
public class Person {
    private String name;
    private int age;

    public Person(String nameAtStart) {
        this.age = 0;
        this.name = nameAtStart;
    }

    public void printPerson() {
        System.out.println(this.name + ", age " + this.age + " years");
    }
}
As seen above, the method is written within the class. The method name is prefixed with public
void since it is assumed that users of the object should be capable of using the method and the
method should not return anything. With objects the keyword static is not used in method
definitions. Next week, we will clarify the reason behind that.
Inside the method printPerson, there is a single line of code that uses the object
variables name and age. The prefix this is used to emphasize
that we are referring to the name and age of this object. All the object variables are visible
from all the methods of the object.
Let us create three persons and ask them to print themselves:
public class Main {
public static void main(String[] args) {
Person pekka = new Person("Pekka");
Person brian = new Person("Brian");
Person martin = new Person("Martin");
pekka.printPerson();
brian.printPerson();
martin.printPerson();
}
}
The output is:
Pekka, age 0 years Brian, age 0 years Martin, age 0 years
Product
Create a class Product that represents a product sold in a webshop. A product
has a price, amount and name.
A new class can be created as follows: Point at the project 073.Product in the
projects tab and click the right mouse button. Then select new and java
class. When a dialog opens, give the class the name Product.
The class should have:
- A constructor
public Product(String nameAtStart, double priceAtStart, int amountAtStart) - A method
public void printProduct()that prints a product in the following form:Banana, price 1.1, amount 13
More methods
Let us create a method that can be used to increase the age of a person by one:
public class Person {
    // ...

    public void becomeOlder() {
        this.age++;;    // same as this.age = this.age + 1;
    }
}
As expected, the method is written inside the class Person. The method increases the
value of object variable age by one.
Let us call the method and see what happens:
public class Main {

    public static void main(String[] args) {
        Person pekka = new Person("Pekka");
        Person andrew = new Person("Andrew");

        pekka.printPerson();
        andrew.printPerson();

        System.out.println("");

        pekka.becomeOlder();
        pekka.becomeOlder();

        pekka.printPerson();
        andrew.printPerson();
    }
}
Output:
Pekka, age 0 years
Andrew, age 0 years

Pekka, age 2 years
Andrew, age 0 years
When born, both objects have age 0 due to the line this.age = 0; in the constructor.
The method becomeOlder of object pekka is called twice. As the output shows, this
causes the age of pekka to increase by two. It should be noted that when the method
becomeOlder is called in the object pekka, the other object andrew
is not touched at all and he remains at age 0. The state of an object is independent of the other
objects!
Also, the object methods can return a value to the caller of the method. Let us define a method that can be used to ask for the age of a person:
public class Person {
    // ...

    public int getAge() {
        return this.age;
    }
}
Now the void in the method definition is replaced with int since the value
the method returns has the type integer. The following example demonstrates, how the value returned by a
method can be used:
public class Main {

    public static void main(String[] args) {
        Person pekka = new Person("Pekka");
        Person andrew = new Person("Andrew");

        pekka.becomeOlder();
        pekka.becomeOlder();

        andrew.becomeOlder();

        System.out.println( "Age of Pekka: "+pekka.getAge() );
        System.out.println( "Age of Andrew: "+andrew.getAge() );

        int total = pekka.getAge() + andrew.getAge();

        System.out.println( "Pekka and Andrew total of "+total+ " years old" );
    }
}
Output:
Age of Pekka: 2
Age of Andrew: 1

Pekka and Andrew total of 3 years old
Multiplier
Implement the class Multiplier that has:
- a constructor
public Multiplier(int number). - a method
public int multiply(int otherNumber)that returnsotherNumbermultiplied bynumber(i.e., the constructor parameter).
Example of usage:
Multiplier threeMultiplier = new Multiplier(3);
System.out.println("threeMultiplier.multiply(2): " + threeMultiplier.multiply(2));

Multiplier fourMultiplier = new Multiplier(4);
System.out.println("fourMultiplier.multiply(2): " + fourMultiplier.multiply(2));

System.out.println("threeMultiplier.multiply(1): " + threeMultiplier.multiply(1));
System.out.println("fourMultiplier.multiply(1): " + fourMultiplier.multiply(1));
Output
threeMultiplier.multiply(2): 6
fourMultiplier.multiply(2): 8
threeMultiplier.multiply(1): 3
fourMultiplier.multiply(1): 4
Decreasing counter
The starting point of this exercise is a partially implemented class
DecreasingCounter:
public class DecreasingCounter {
    private int value;   // object variable that remembers the value of the counter

    public DecreasingCounter(int valueAtStart) {
        this.value = valueAtStart;
    }

    public void printValue() {
        System.out.println("value: " + this.value);
    }

    public void decrease() {
        // write here the code that decrements the value of counter by one
    }

    // and here the rest of the methods
}
The counter can be used as follows:
public class Main {
    public static void main(String[] args) {
        DecreasingCounter counter = new DecreasingCounter(10);

        counter.printValue();

        counter.decrease();
        counter.printValue();

        counter.decrease();
        counter.printValue();
    }
}
Output should be:
value: 10
value: 9
value: 8
The constructor of DecreasingCounter receives as parameter the initial value of
the counter. In the example, the constructor parameter is 10, which is then set to the
object variable this.value. The value of the counter can be printed with the method
printValue(). The method decrease() should decrease the value of the
counter by one.
Implementing method decrease()
Implement the method decrease() so that when called, the object variable
this.value is decreased by one. When this is done, your program should work as the
example above.
Value remains positive
Change your implementation of the method decrease() so that the value of the
counter will not drop below zero. If the method is called when the value is zero, nothing
should happen:
public class Main {
    public static void main(String[] args) {
        DecreasingCounter counter = new DecreasingCounter(2);

        counter.printValue();

        counter.decrease();
        counter.printValue();

        counter.decrease();
        counter.printValue();

        counter.decrease();
        counter.printValue();
    }
}
Output should be:
value: 2
value: 1
value: 0
value: 0
Counter reset
Implement the method public void reset() that sets the value of the counter to
zero. Example of usage:
public class Main {
    public static void main(String[] args) {
        DecreasingCounter counter = new DecreasingCounter(100);

        counter.printValue();

        counter.reset();
        counter.printValue();

        counter.decrease();
        counter.printValue();
    }
}
Output:
value: 100
value: 0
value: 0
Back to initial value
Implement the method public void setInitial(), which returns the counter to its
initial value:
public class Main {
    public static void main(String[] args) {
        DecreasingCounter counter = new DecreasingCounter(100);

        counter.printValue();

        counter.decrease();
        counter.printValue();

        counter.decrease();
        counter.printValue();

        counter.reset();
        counter.printValue();

        counter.setInitial();
        counter.printValue();
    }
}
Output:
value: 100
value: 99
value: 98
value: 0
value: 100
Hint: add to the class a new object variable that remembers the initial value of the counter
Menu
In this assignment, we will implement a class Menu that holds information about
meals that are available in a cafeteria.
Our starting point is the following class skeleton:
import java.util.ArrayList;

public class Menu {

    private ArrayList<String> meals;

    public Menu() {
        this.meals = new ArrayList<String>();
    }

    // Implement the methods here
}
Menu objects store the information of meals using an object variable of type ArrayList<String>
Adding a meal to menu
Implement the method public void addMeal(String meal) that adds a new meal to
the list this.meals of a Menu object. If the meal is already in the list, it
should not be added.
Printing the menu
Implement the method public void printMeals() that prints the meals in a menu.
As an example, the output after three additions could be:
Hamburger
Fish'n'Chips
Sauerkraut
Clearing a menu
Implement the method public void clearMenu() that clears a menu. After
calling this method, the menu should be empty. Class ArrayList has a method that is
useful here. Within your method body write meals. and see how NetBeans helps you
by showing the available methods.
The Person class grows
Let us get back to work on the Person class. The current version of the class looks
like this:
public class Person {
    private String name;
    private int age;

    public Person(String initialName) {
        this.age = 0;
        this.name = initialName;
    }

    public void printPerson() {
        System.out.println(this.name + ", age " + this.age + " years");
    }

    public void becomeOlder() {
        this.age = this.age + 1;
    }
}
Let us create a method for person that can figure out if a person is an adult. The method
returns a boolean -- either true or false:
public class Person {
    // ...

    public boolean isAdult(){
        if ( this.age < 18 ) {
            return false;
        }

        return true;
    }

   /*
      note that the method could also be written like this:

      public boolean isAdult(){
        return this.age >= 18;
      }
   */
}
Let us test it:
    public static void main(String[] args) {
        Person bob = new Person("Bob");
        Person andy = new Person("Andy");

        int i = 0;
        while ( i < 30 ) {
            bob.becomeOlder();
            i++;
        }

        andy.becomeOlder();

        System.out.println("");

        if ( andy.isAdult() ) {
            System.out.print("adult: ");
            andy.printPerson();
        } else {
            System.out.print("minor: ");
            andy.printPerson();
        }

        if ( bob.isAdult() ) {
            System.out.print("adult: ");
            bob.printPerson();
        } else {
            System.out.print("minor: ");
            bob.printPerson();
        }
    }
minor: Andy, age 1 years
adult: bob, age 30 years
Let us tune up the solution a little further. Now, a person can only be printed in a manner where in addition to the name, the age also gets printed. In some cases, we might only want to print the name of the object. Let us tailor a method for this purpose:
public class Person {
    // ...

    public String getName() {
        return this.name;
    }
}
The method getName returns the object variable name to its caller. The
name of the method might seem a little odd (or not). In Java, it is considered the 'correct' way
to name an object-variable-returning method in this manner; as getVariableName. Methods
like these are often called 'getters'.
Let us edit the main program to use the new 'getter':
    public static void main(String[] args) {
        Person bob = new Person("bob");
        Person andy = new Person("andy");

        int i = 0;
        while ( i < 30 ) {
            bob.becomeOlder();
            i++;
        }

        andy.becomeOlder();

        System.out.println("");

        if ( andy.isAdult() ) {
            System.out.println( andy.getName() + " is an adult" );
        } else {
            System.out.println( andy.getName() + " is a minor" );
        }

        if ( bob.isAdult() ) {
            System.out.println( bob.getName() + " is an adult" );
        } else {
            System.out.println( bob.getName() + " is a minor" );
        }
    }
The print is starting to look pretty clean:
andy is a minor
bob is an adult
toString
We have been guilty of bad programming style; we have created a method that prints an object,
printPerson. The recommended way of doing this is by
defining a method that returns a "character string representation" of the object. In Java, a
method returning a String representation is called toString. Let us define this
method for person:
public class Person {
    // ...

    public String toString() {
        return this.name + ", age " + this.age + " years";
    }
}
The method toString works just like printPerson, but instead of printing
it the method returns the string representation. The call to the method can be used for printing it if necessary.
The method is used in a slightly surprising way:
    public static void main(String[] args) {
        Person bob = new Person("Bob");
        Person andy = new Person("Andy");

        int i = 0;
        while ( i < 30 ) {
            bob.becomeOlder();
            i++;
        }

        andy.becomeOlder();

        System.out.println( andy ); // same as System.out.println( andy.toString() );
        System.out.println( bob ); // same as System.out.println( bob.toString() );
    }
The principle is that the System.out.println method requests the string representation of
an object and then prints it. The returned string representation of the toString method
does not have to be written, as Java adds it automatically. When the programmer writes:
System.out.println( andy );
Java completes the call during runtime to the format:
System.out.println( andy.toString() );
What happens is that the object is asked for its string representation. The string representation the
object is returned and is printed normally with the System.out.println command.
We can get rid of the obsolete printObject method.
Lyyra-card
The University of Helsinki students use a so-called Lyyra cards to pay for their meals in
student cafeterias. In this assignment, we implement the class LyyraCard that simulates
the Lyyra card.
Class skeleton
Start by adding the class LyyraCard to your project.
Then implement the LyyraCard constructor that gets the starting balance of
the card as parameter. The card saves the balance in the object variable balance.
Implement also the toString method that returns a string of the form "The
card has X euros".
The skeleton of class LyyraCard looks like this:
public class LyyraCard {
    private double balance;

    public LyyraCard(double balanceAtStart) {
        // write code here
    }

    public String toString() {
        // write code here
    }
}
The following main program can be used to test the program:
public class Main {
    public static void main(String[] args) {
        LyyraCard card = new LyyraCard(50);
        System.out.println(card);
    }
}
The output should be:
The card has 50.0 euros
Paying with card
Implement the following methods to LyyraCard:
public void payEconomical() {
    // write code here
}

public void payGourmet() {
    // write code here
}
Method payEconomical should decrease the balance by 2.50 euros and method
payGourmet by 4.00 euros.
The following main program can be used to test the program:
public class Main {
    public static void main(String[] args) {
        LyyraCard card = new LyyraCard(50);
        System.out.println(card);

        card.payEconomical();
        System.out.println(card);

        card.payGourmet();
        card.payEconomical();
        System.out.println(card);
    }
}
The output should be:
The card has 50.0 euros
The card has 47.5 euros
The card has 41.0 euros
Balance nonnegative
Change methods payEconomical and payGourmet so that if there is
not enought money, the balance does not change.
The following main program can be used to test the program:
public class Main {
    public static void main(String[] args) {
        LyyraCard card = new LyyraCard(5);
        System.out.println(card);

        card.payGourmet();
        System.out.println(card);

        card.payGourmet();
        System.out.println(card);
    }
}
The output should be:
The card has 5.0 euros
The card has 1.0 euros
The card has 1.0 euros
Above, the second call payGourmet does not alter the balance since there is not
enough money on the card for a gourmet lunch.
Loading money to card
Add the LyyraCard the following method:
public void loadMoney(double amount) {
    // write code here
}
The method should increase the balance of the card by the given amount. However, the maximum balance on a card is 150 euros. In case the balance after loading money would be more than that, it should be truncated to 150 euros.
The following main program can be used to test the program:
public class Main {
    public static void main(String[] args) {
        LyyraCard card = new LyyraCard(10);
        System.out.println(card);

        card.loadMoney(15);
        System.out.println(card);

        card.loadMoney(10);
        System.out.println(card);

        card.loadMoney(200);
        System.out.println(card);
    }
}
The output should be:
The card has 10.0 euros
The card has 25.0 euros
The card has 35.0 euros
The card has 150.0 euros
Loading a negative amount
Change the method loadMoney so that the balance of the card does not change if
the amount to load is negative.
The following main program can be used to test the program:
public class Main {
    public static void main(String[] args) {
        LyyraCard card = new LyyraCard(10);
        System.out.println("Pekka: " + card);
        card.loadMoney(-15);
        System.out.println("Pekka: " + card);
    }
}
The output should be:
Pekka: The card has 10.0 euros
Pekka: The card has 10.0 euros
Multiple cards
Write a main method that does the following:
- Creates a LyyraCard for Pekka with initial balance of 20 euros
- Creates a LyyraCard for Brian with initial balance of 30 euros
- Pekka buys gourmet lunch
- Brian buys economical lunch
- cards are printed (both on their own row, starting with the name of the card owner)
- Pekka loads 20 euros
- Brian buys gourmet lunch
- cards are printed (both on their own row, starting with the name of the card owner)
- Pekka buys economical lunch
- Pekka buys economical lunch
- Brian loads 50 euros
- cards are printed (both on their own row, starting with the name of the card owner)
The main skeleton is as follows:
public class Main {
    public static void main(String[] args) {
        LyyraCard cardPekka = new LyyraCard(20);
        LyyraCard cardBrian = new LyyraCard(30);

        // write code here
    }
}
The output should be:
Pekka: The card has 16.0 euros
Brian: The card has 27.5 euros
Pekka: The card has 36.0 euros
Brian: The card has 23.5 euros
Pekka: The card has 31.0 euros
Brian: The card has 73.5 euros
More methods
Let us continue with the class Person. We would be interested in knowing the body mass index of a person. To calculate the index,
we need to know the height and weight of the person. We add for both height and weight object
variables and methods that can be used to assign the variables a value. When this is in place, we
add a method that calculates the body mass index.
Here is the class Person after the changes (only the
parts affected by the change are shown):
public class Person {
    private String name;
    private int age;
    private int weight;
    private int height;

    public Person(String initialName) {
        this.age = 0;
        this.name = initialName;
        this.weight = 0;
        this.height = 0;
    }

    public void setHeight(int newHeight) {
        this.height = newHeight;
    }

    public void setWeight(int newWeight) {
        this.weight = newWeight;
    }

    public double bodyMassIndex(){
        double heightDividedByHundred = this.height / 100.0;
        return this.weight / ( heightDividedByHundred * heightDividedByHundred );
    }

    // ...
}
We added object variables height and weight, and methods
setHeight and setWeight that can be used to give values to the variables. In
naming the methods, we follow the Java convention to call a method that just sets a new value to a
variable setVariableName. This type of methods are usually called setter
methods.
The new methods in use:
public static void main(String[] args) {
    Person matti = new Person("Matti");
    Person john = new Person("John");

    matti.setHeight(180);
    matti.setWeight(86);

    john.setHeight(175);
    john.setWeight(64);

    System.out.println(matti.getName() + ", body mass index: " + matti.bodyMassIndex());
    System.out.println(john.getName() + ", body mass index: " + john.bodyMassIndex());
}
The output:
Matti, body mass index: on 26.54320987654321
John, body mass index: on 20.897959183673468
Object variable and parameter with identical name
Above, the method setHeight assigns the object variable height the value of
the parameter newHeight:
public void setHeight(int newHeight) {
    this.height = newHeight;
}
The parameter could also be named identically with the object variable:
public void setHeight(int height) {
    this.height = height;
}
Now, the name height means the parameter height and the identically named
object variable is referred to as this.height. The following would not work since the
object variable height is not at all referred to in the code:
public void setHeight(int height) {
    // DOES NOT WORK!
    height = height;
    // this just assigns the value of the parameter to the parameter itself
}
Contolling the number of decimals when printing a float
The number of decimals in the last output was far too high, two decimals would be enough. One
technique to control how a float number is printed is to use the command
String.format.
If value is a float number, the command String.format( "%.2f", value )
returns a string where the value is rounded to contain 2 decimals. The number between dot and f defines
the amount of decimals shown.
After changing the code, we have the following:
System.out.println(matti.getName() + ", body mass index: " + String.format( "%.2f", matti.bodyMassIndex()));
System.out.println(john.getName() + ", body mass index: " + String.format( "%.2f", john.bodyMassIndex()));
The output is:
Matti,  body mass index: 26,54
John,  body mass index: 20,90
The method String.format is not the most flexible way provided by Java for
formatting float values, but it is simple to use and suits our purposes here well.
Clock using a counter
We start by implementing a class BoundedCounter and then use counter objects to
implement a clock.
BoundedCounter
Implement class BoundedCounter with the following functionality:
- A counter has an object variable that remembers the value of the counter. The value is within the range 0..upperBound
- In the beginning the value is 0.
- The upper bound of the value is defined by the constructor parameter.
- The method
nextincrements the value of the counter. If the value would be more that the upper limit, it wraps around and becomes zero. - The method
toStringreturns a string representation of the counter value.
The skeleton of the class is as follows:
public class BoundedCounter {
    private int value;
    private int upperLimit;

    public BoundedCounter(int upperLimit) {
        // write code here
    }

    public void next() {
        // write code here
    }

    public String toString() {
        // write code here
    }
}
Note: you cannot return an integer value directly from the method toString since the
method should return a string. Integer variable value can be turned into a string
by prefixing it with an empty string: "" + value.
A main program that uses the counter:
public class Main {
    public static void main(String[] args) {
        BoundedCounter counter = new BoundedCounter(4);
        System.out.println("Value at start: " + counter );

        int i = 0;
        while ( i < 10) {
            counter.next();
            System.out.println("Value: " + counter );
            i++;
        }
    }
}
In the constructor, an upper limit of 4 is given to the new counter object. Now, the value of
the counter should be within the range 0...4. Note how the method next increases
the value until it hits the upper limit and becomes zero again:
Value at start: 0
Value: 1
Value: 2
Value: 3
Value: 4
Value: 0
Value: 1
Value: 2
Value: 3
Value: 4
Value: 0
Printing the initial zero
Imrove toString so that if the value of the counter is less than 10, it
prefixes the value with 0. If the value of the counter is e.g. 3, toString should produce
"03". If the value is at least 10, e.g. 12, the returned string would be
"12".
A main program that demonstrates the desired functionality of the improved toString.
public class Main {
    public static void main(String[] args) {
        BoundedCounter counter = new BoundedCounter(14);
        System.out.println("Value at start: " + counter );

        int i = 0;
        while ( i < 16){
            counter.next();
            System.out.println("value: " + counter );
            i++;
        }
    }
}
value at start: 00
value: 01
value: 02
value: 03
value: 04
value: 05
value: 06
value: 07
value: 08
value: 09
value: 10
value: 11
value: 12
value: 13
value: 14
value: 00
value: 01
The first version of the clock
With two counter objects it possible for us to build a simple clock. Hours can be represented by a counter with upper bound 23 and minutes by a counter with upper bound 59. As we all know, when minutes wrap around from 59 to 0, hours advance by one.
First you should implement the method getValue for the counters in the class:
public int getValue() {
    // write here code that returns the value
}
Then implement the clock in your main method in the following style:
public class Main {
    public static void main(String[] args) {
        BoundedCounter minutes = new BoundedCounter(59);
        BoundedCounter hours = new BoundedCounter(23);

        int i = 0;
        while ( i < 121 ) {
            System.out.println( hours + ":" + minutes);   // the current time printed
            // advance minutes
            // if minutes become zero, advance hours
            i++;
        }
    }
}
The output should be:
00:00
00:01
...
00:59
01:00
01:01
01:02
...
01:59
02:00
The second version of the clock
Firstly implement the method setValue to the class BoundedCounter. The
method should set the value of the parameter to the counter unless the parameter is less than
zero or larger than the upper bound. In those cases, the method does not have any effect.
Then add a seconds counter to your clock. The clock should now be as follows:
public class Main {
    public static void main(String[] args)  {
        Scanner reader = new Scanner(System.in);
        BoundedCounter seconds = new BoundedCounter(59);
        BoundedCounter minutes = new BoundedCounter(59);
        BoundedCounter hours = new BoundedCounter(23);

        System.out.print("seconds: ");
        int s = // read the initial value of seconds from the user
        System.out.print("minutes: ");
        int m = // read the initial value of minutes from the user
        System.out.print("hours: ");
        int h = // read the initial value of hours from the user

        seconds.setValue(s);
        minutes.setValue(m);
        hours.setValue(h);

        int i = 0;
        while ( i < 121 ) {
            // like in previous but seconds taken into account

            i++;
        }

    }
}
Ensure that all works as expected when starting e.g. with time 23:59:50.
The output should be:
seconds: 50
minutes: 59
hours: 23
23:59:50
23:59:51
23:59:52
...
Bonus: eternal clock (exercise not assessed with TMC!)
Before you start, submit the exercise for assesment.
Change your main as follows:
public class Main {
    public static void main(String[] args) throws Exception {
        BoundedCounter seconds = new BoundedCounter(59);
        BoundedCounter minutes = new BoundedCounter(59);
        BoundedCounter hours = new BoundedCounter(23);

        seconds.setValue(50);
        minutes.setValue(59);
        hours.setValue(23);

        while ( true ) {
            System.out.println( hours + ":" + minutes + ":" + seconds );
            Thread.sleep(1000);
            // put here the logic to advance your clock by one second
        }
    }
}
Now, the clock goes on forever and the value is updated as it should be, once in a second. The clock estimates the duration of a
second with the command Thread.sleep(1000); The parameter in the command
is the time to sleep in milliseconds. In order to use the sleep command, you should do an
addition to the definition of main: public static void main(String[] args) throws
Exception {
You can end the eternal clock by pressing the red box in the NetBeans console (i.e. the area in NB where the output of programs gets printed).
Important notes regarding the use of objects. You should definitely read these.
Object-oriented programming is mostly about turning concepts into their own entities, or in other
words forming abstractions. One might think that it is pointless to create an object that only holds
one number in it, and that the same could be achieved with simple int variables. This is
not the case. If a clock consists of just 3 int variables that are then increased, the program loses
some human readability. It becomes more difficult to "see" what the program is about. Earlier
in the material we mentioned the advice of the renown programmer Kent Beck: "Any fool can
write code that a computer can understand. Good programmers write code that humans can
understand", since the hand of a clock is its own clearly definable concept, it is a
good idea to create it an own class - BoundedCounter - for the sake of human
readability.
Turning a concept into a class of its own is a good idea for a lot of reasons. Firstly, some details
(i.e. when the counter makes a full round) can be hidden inside the class (abstracted). Instead
of writing an if-clause and an assignment operation, it is enough that the user of the counter calls
the descriptively named method next(). In addition to clocks, the created counter might be
good for being used as a building block for other projects too, so a class made from a clear concept
can be very versatile. Another huge advantage we gain by writing code this way, is that when the details
of the mechanics are hidden, they can be changed if need be.
We established that a clock contains three hands, it consists of three concepts. Actually the clock itself is a concept too and next week we will make the class Clock. Then, we can create distinct Clock objects. Clock will be an object which functionality is based on "simpler" objects, the hands. This is the grand idea of object-oriented programming: a program is built out of small, clearly defined co-operating objects.
Now, we will take some careful first steps in the object world. Towards the end of the course, objects will start to come to you naturally and the idea of programs being built out of small, well defined, co-operating pieces - which at this point might feel incomprehensible - will become something you will take for granted.
Calling other methods within an object
Objects can also call its own methods. Let us assume we would like to include body mass index in the
string representation of the person objects. Instead of calculating the body mass index in the toString
method, a better idea is to call the method bodyMassIndex from the toString
method:
public String toString() {
    return this.name + ", age " + this.age + " years, my body mass index is " + this.bodyMassIndex();
}
As can be seen, an object can call its own method by prefixing the method name with
this and dot. The this is not necessary, so also the following works:
public String toString() {
    return this.name + ", age " + this.age + " years, my body mass index is " + bodyMassIndex();
}
Now it is time to continue practising programming.
NumberStatistics
Amount of numbers
Implement class NumberStatistics with the following methods:
addNumberadds a new number to the statisticsamountOfNumberstells us how many numbers have been added to the statistics
Note that the class should not store the added numbers. At this stage, it is enough
to remember how many added numbers there are, i.e. how many times the method
addNumber has been called.
The class skeleton:
public class NumberStatistics {
    private int amountOfNumbers;

    public NumberStatistics() {
        // initialize here the object variable amountOfNumbers
    }

    public void addNumber(int number) {
        // code here
    }

    public int amountOfNumbers() {
        // code here
    }
}
A usage example:
public class Main {
   public static void main(String[] args) {
      NumberStatistics stats = new NumberStatistics();
      stats.addNumber(3);
      stats.addNumber(5);
      stats.addNumber(1);
      stats.addNumber(2);
      System.out.println("Amount: " + stats.amountOfNumbers());
    }
}
The output should be:
Amount: 4
sum and average
Add the following methods to the class:
sumreturns the sum of the added numbers (if no numbers added, the sum is 0)averagereturns the average of the added numbers (if no numbers added, the average is 0)
The class skeleton now:
public class NumberStatistics {
    private int amountOfNumbers;
    private int sum;

    public NumberStatistics() {
        // initialize here the object variable amountOfNumbers
    }

    public void addNumber(int number) {
        // code here
    }

    public int amountOfNumbers() {
        // code here
    }

    public int sum() {
        // code here
    }

    public double average() {
        // code here
    }
}
A usage example:
public class Main {
    public static void main(String[] args) {
        NumberStatistics stats = new NumberStatistics();
        stats.addNumber(3);
        stats.addNumber(5);
        stats.addNumber(1);
        stats.addNumber(2);
        System.out.println("Amount: " + stats.amountOfNumbers());
        System.out.println("sum: " + stats.sum());
        System.out.println("average: " + stats.average());
    }
}
The output should be:
Amount: 4
sum: 11
average: 2.75
Asking for numbers from the user
Create a program that asks the user to input numbers of type integer. When the user gives -1, the program stops and prints the sum of the given numbers (excluding the -1).
Note: you should not make any changes to class NumberStatistics!
The program should use a NumberStatistics object to calculate the sum.
Type numbers:
4
2
5
4
-1
sum: 15
Many sums
Change your program so that it also calculates the sum of even and odd numbers in the user input (again -1 excluded).
NOTE: define in your program three NumberStatistics objects. The
first is used to track the sum of all the numbers. The second takes care of even numbers and
the third the odd numbers. Remember also that you should not make any changes to class
NumberStatistics!
The tests does not work if you do not create the objects in the order mentioned above!!
The program should work as follows:
Type numbers:
4
2
5
2
-1
sum: 13
sum of even: 8
sum of odd: 5
Randomness
When programming, you may occasionally need to simulate random events. Situations such as the
unpredictability of weather, or surprising moves on the AI's part in a computer game can often be
simulated with random number generators, running on a computer. In Java, there is a ready-made class
Random, which you can use in the following way:
import java.util.Random;

public class Randomizing {
    public static void main(String[] args) {
        Random randomizer = new Random(); // creates a random number generator
        int i = 0;

        while (i < 10) {
            // Generates and prints out a new random number on each round of the loop
            System.out.println(randomizer.nextInt(10));
            i++;
        }
    }
}
In the code above, you first create an instance of the class Random with the keyword
new -- exactly as when creating objects implementing other classes. An object of type
Random has the method nextInt that can be given an integer value as parameter. The
method returns a random integer within the range 0..(the integer given as parameter- 1).
The printout of this program could be as follows:
2
2
4
3
4
5
6
0
7
8
We will need floating point numbers, for example when dealing with probability calculations. In
computing, probabilities are usually calculated with numbers within the range [0..1]. An object of the
class Random can return random floating point numbers with the method nextDouble.
Let us consider the following probabilities of weather conditions:
- Sleet with the probability 0.1 (10%)
- Snow with the probability 0.3 (30%)
- Sunny with the probability 0.6 (60%)
Using the estimates above, let us create a weather forecaster.
import java.util.ArrayList;
import java.util.Random;

public class WeatherForecaster {
    private Random random;

    public WeatherForecaster() {
        this.random = new Random();
    }

    public String forecastWeather() {
        double probability = this.random.nextDouble();

        if (probability <= 0.1) {
            return "Sleet";
        } else if (probability <= 0.4) { // 0.1 + 0.3
            return "Snow";
        } else { // the rest, 1.0 - 0.4 = 0.6
            return "Sunny";
        }
    }

    public int forecastTemperature() {
        return (int) ( 4 * this.random.nextGaussian() - 3 );
    }
}
The method forecastTemperature is interesting in many ways. Within this method, we are
calling the method this.random.nextGaussian(), just like any other time we have called a
method in the previous examples. Interestingly, this method of the class Random returns a value from the
normal distribution (if you have no interest in the different varieties of random figures,
that's okay!).
public int forecastTemperature() {
    return (int) ( 4 * this.random.nextGaussian() - 3 );
}
In the expression above, interesting is the section (int). This part of the
expression changes the bracketed floating point number into an integer value. A corresponding method
transforms integer values into floating point numbers: (double) integer. This is called an
explicit type conversion.
Let us create a class with a main method that uses the class WeatherForecaster.
public class Program {

    public static void main(String[] args) {
        WeatherForecaster forecaster = new WeatherForecaster();

        // Use a list to help you organise things
        ArrayList<String> days = new ArrayList<String>();
        Collections.addAll(days, "Mon", "Tue", "Wed", "Thu", "Fri", "Sat", "Sun");

        System.out.println("Weather forecast for the next week:");
        for(String day : days) {
            String weatherForecast = forecaster.forecastWeather();
            int temperatureForecast = forecaster.forecastTemperature();

            System.out.println(day + ": " + weatherForecast + " " + temperatureForecast + " degrees.");
        }
    }
}
The printout from this program could be as follows:
Weather forecast for the next week:
Mon: Snow 1 degrees.
Tue: Snow 1 degrees.
Wed: Sunny -2 degrees.
Thu: Sunny 0 degrees.
Fri: Snow -3 degrees.
Sat: Snow -3 degrees.
Sun: Sunny -5 degrees.
Rolling the dice
In the template is class Dice that has the following functionality:
- The constructor
Dice(int numberOfSides)creates a new dice object that has the amount of sides defined by the argument. - The method
rolltells the result of a roll (which depends on the number of its sides)
The frame of the program is as follows:
import java.util.Random;

public class Dice {
    private Random random;
    private int numberOfSides;

    public Dice(int numberOfSides){
        this.numberOfSides = numberofSides;
        random = new Random();

    }

    public int roll() {
          // we'll get a random number in the range 1-numberOfSides<
    }
}
Expand the class Dice so that with each roll the dice returns a random number
between 1...number of sides. Here is a main program that tests the dice:
public class Program {
    public static void main(String[] args) {
        Dice dice = new Dice(6);

        int i = 0;
        while ( i < 10 ) {
            System.out.println( dice.roll() );
            i++;
        }
    }
}
The output could look something like this:
1
6
3
5
3
3
2
2
6
1
Password randomizer
Your assignment is to expand the class PasswordRandomizer that has the
following functionality:
- The constructor
PasswordRandomizercreates a new object, which uses the given password length. - The method
createPasswordreturns a new password, which consists of symbols a-z and is of the length given as a parameter to the constructor
The frame of the class is as follows:
import java.util.Random;

public class PasswordRandomizer {
    // Define the variables here

    public PasswordRandomizer(int length) {
        // Format the variable here
    }

    public String createPassword() {
      // Write the code here which returns the new password
    }
}
In the following is a program that uses a PasswordRandomizer object:
public
class Program {
    public static void main(String[] args) {
        PasswordRandomizer randomizer = new PasswordRandomizer(13);
        System.out.println("Password: " + randomizer.createPassword());
        System.out.println("Password: " + randomizer.createPassword());
        System.out.println("Password: " + randomizer.createPassword());
        System.out.println("Password: " + randomizer.createPassword());
    }
}
The output could look something like this:
Password: mcllsoompezvs
Password: urcxboisknkme
Password: dzaccatonjcqu
Password: bpqmedlbqaopq
Tip 1: this is how you turn the integer number into a character:
int number = 17;
char symbol = "abcdefghijklmnopqrstuvwxyz".charAt(number);
Tip 2: The tip in assignment 58 might be useful in this one too.
Lottery
Your assignment is to expand the class LotteryNumbers, which draws the lottery
numbers of the week. The numbers of the week
consist of 7 different numbers between 1 and 39. The class has the following functionality:
- the constructor
LotteryNumberscreates a new LotteryNumbers object, which contains the new drawn numbers - the method
numbersreturns the drawn numbers of this draw - the method
drawNumbersdraws new numbers - the method
containsNumberreveals if the number is among the drawn numbers
The frame of the class is as follows:
import java.util.ArrayList;
import java.util.Random;

public class LotteryNumbers {
    private ArrayList<Integert> numbers;

    public LotteryNumbers() {
        // We'll format a list for the numbers
        this.numbers = new ArrayList<Integert>();
        // Draw numbers as LotteryNumbers is created
        this.drawNumbers();
    }

    public ArrayList<Integert> numbers() {
        return this.numbers;
    }

    public void drawNumbers() {
        // Write the number drawing here using the method containsNumber()
    }

    public boolean containsNumber(int number) {
        // Test here if the number is already among the drawn numbers
    }
}
The following main program comes with the template:
import java.util.ArrayList;

public class Program {
    public static void main(String[] args) {
        LotteryNumbers lotteryNumbers = new LotteryNumbers();
        ArrayList<Integert> numbers = lotteryNumbers.numbers();

        System.out.println("Lottery numbers:");
        for (int number : numbers) {
            System.out.print(number + " ");
        }
        System.out.println("");
    }
}
The program can print lines like these:
Lottery numbers:
3 5 10 14 15 27 37
Lottery numbers:
2 9 11 18 23 32 34
Note! a number can be in one set of numbers only once (per draw of course).
Game logic for Hangman
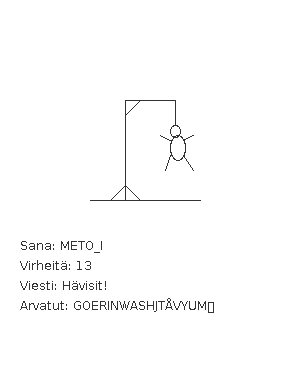
Your Finnish friend designed a Hangman game that looks like the following:
Your friend has programmed the user interface and also a skeleton for the game logic. Now, she asks you to finish the remaining pieces of the game logic.
The Finnish words sana, virheitä, viesti, hävisit and arvatut (kirjaimet) translate into word, (number of) faults, message, you lost and guessed (letters) respectively.
Amongst other stuff, with TMC you get the following skeleton for the class
HangmanLogic
public class HangmanLogic {

    private String word;
    private String guessedLetters;
    private int numberOfFaults;

    public HangmanLogic(String word) {
        this.word = word.toUpperCase();
        this.guessedLetters = "";
        this.numberOfFaults = 0;
    }

    public int numberOfFaults() {
        return this.numberOfFaults;
    }

    public String guessedLetters() {
        return this.guessedLetters;
    }

    public int losingFaultAmount() {
        return 12;
    }

    public void guessLetter(String letter) {
        // program here the functionality for making a guess

        // if the letter has already been guessed, nothing happens

        // it the word does not contains the guessed letter, the number of faults increases
        // the letter is added among the already guessed letters
    }

    public String hiddenWord() {
        // program here the functionality for building the hidden word

        // create the hidden word by iterating through this.word letter by letter
        // if the letter in turn is within the guessed words, put it in the hidden word
        // if the letter is not among the guessed ones, replace it with _ in the hidden word

        // return the hidden word at the end

        return "";
    }
}
In this assignment, you should only touch class HangmanLogic and implement
the functionality of the methods guessLetter(String letter) and
hiddenWord().
Testing the code
The TMC project includes two classes that help you with testing. The class
Main starts the graphical version of the game. The class TestProgram
can be used to test the class HangmanLogic.
Guessing a letter
Touch only the method guessLetter(String letter) in this assignment!
When a user guesses a letter, the user interface calls method guessLetter which
is supposed to take care of action related to guessing a letter. First, it should check if the
letter has already been guessed. In that case, the method does not do anything.
The method increases the number of faults (this.numberOfFaults) if the word
(this.word) does not contain the guessed letter. Then the letter is added among the
already guessed letters (the object variable this.guessedLetters).
An example of how the method guessLetter should work:
HangmanLogic l = new HangmanLogic("kissa");
System.out.println("guessing: A, D, S, F, D");
l.guessLetter("A");   // correct
l.guessLetter("D");   // wrong
l.guessLetter("S");   // correct
l.guessLetter("F");   // wrong
l.guessLetter("D");   // This should not have any effect on the number of faults since D was already guessed
System.out.println("guessed letters: "+l.guessedLetters());
System.out.println("number of faults: "+l.numberOfFaults());
guessing: A, D, S, F, D
guessed letters: ADSF
number of faults: 2
Creating the hidden word
The Hangman user interface shows a hidden version of the word to the user. In the above
figure, the hidden word is METO_I. All the letters that the user has already guessed are shown
in the hidden word but the rest of the letters are replaced with underscores. In this part of
the assignment, you should complete the method hiddenWord of Hangman logic that
takes care of building the hidden word for the user interface.
Commands while, charAt and contains might be useful
here. Note that a single char can be made into a string as follows:
char c = 'a';
String aString = "" + c;
An example of how the method works:
HangmanLogic l = new HangmanLogic("kissa");
System.out.println("word is: "+l.hiddenWord());

System.out.println("guessing: A, D, S, F, D");
l.guessLetter("A");
l.guessLetter("D");
l.guessLetter("S");
l.guessLetter("F");
l.guessLetter("D");
System.out.println("guessed letters: "+l.guessedLetters());
System.out.println("number of faults: "+l.numberOfFaults());
System.out.println("word now: "+l.hiddenWord());
word is: _____
guessing: A, D, S, F, D
guessed letters: ADSF
number of faults: 2
word now: __SSA
Now, you can test the game by using class Main. You can change the guessed word
by changing the constructor parameter of the game logic:
HangmanLogic logic = new HangmanLogic("parameter");
HangmanUI game = new HangmanUI(logic);
game.start();
The game is played with the keyboard. You can end the game by pressing x in the upper left corner of the game window.