Object-Oriented Programming with Java, part II
 This material is licensed under the Creative Commons BY-NC-SA license, which means that you can use it and distribute it freely so long as you do not erase the names of the original authors. If you do changes in the material and want to distribute this altered version of the material, you have to license it with a similar free license. The use of the material for commercial use is prohibited without a separate agreement.
Writing to a File
In section 15, we learnt that reading from a file happened with the help of the classes Scanner and File. The class FileWriter provides the functionality to write to a file. The FileWriter constructor is given as parameter a String illustrating the file location.
FileWriter writer = new FileWriter("file.txt");
writer.write("Hi file!\n"); // the line break has to be written, too!
writer.write("Adding text\n");
writer.write("And more");
writer.close(); // the call closes the file and makes sure the written text goes to the file
In the example we write the string "Hi file!" to the file "file.txt"; that is followed by a line break, and by more text. Note that when you use the write method, it does not produce line breaks, but they have to be added later manually.
Both the FileWriter constructor and the write method may throw an exception, which has to be either handled or the responsibility has to be delegated to the calling method. The method which is given as parameter the file name and the text to write into it can look like the following.
public class FileHandler {

    public void writeToFile(String fileName, String text) throws Exception {
        FileWriter writer = new FileWriter(fileName);
        writer.write(text);
        writer.close();
    }
}
In the above writeToFile method, we first create a FileWriter object, which writes into the fileName file stored at the location specified as parameter. After this, we write into the file using the write method. The exception the constructor and write method can possibly throw has to be handled either with the help of a try-catch block or delegating the responsibility. In the method writeToFile the responsibility was delegated.
Let's create a main method where we call the writeToFile method of a FileHandler object. The exception does not have to be handled in the main method either, but the method can declare to throw possibly an exception throw the definition throws Exception.
    public static void main(String[] args) throws Exception {
        FileHandler handler = new FileHandler();
        handler.writeToFile("diary.txt", "Dear Diary, today was a nice day.");
    }
When we call the method above, we create the file "diary.txt", where we write the text "Dear Diary, today was a nice day.". If the file exists already, the old content is erased and the new one is written. FileWriter allows us to add text at the end of the already existing file by providing additional parameter boolean append, without erasing the existing text. Let's add the method appendToFile() to the class FileHandler; the method appends the text received as parameter to the end of the file.
public class FileHandler {
    public void writeToFile(String fileName, String text) throws Exception {
        FileWriter writer = new FileWriter(fileName);
        writer.write(text);
        writer.close();
    }

    public void appendToFile(String fileName, String text) throws Exception {
        FileWriter writer = new FileWriter(fileName, true);
        writer.write(text);
        writer.close();
    }
}
In most of the cases, instead of writing text at the end of a file with the method append, it is easier to write all the file again.
File Manager
Together with the exercise body, you find the class FileManager, which contains the method bodies to read a write a file.
File Reading
Implement the method public ArrayList<String> read(String file) to return the lines of the parameter file in ArrayList form, each file line being a String contained by the ArrayList.
There are two text files to help testing the project: src/testinput1.txt and src/testinput2.txt. The methods are supposed to be used in the following way:
    public static void main(String[] args) throws FileNotFoundException, IOException {
        FileManager f = new FileManager();

        for (String line : f.read("src/testinput1.txt")) {
            System.out.println(line);
        }
    }
The print output should look like the following
first
second
Writing a Line
Modify the method public void save(String file, String text) so that it would write the string of the second argument into the file of the first argument. If the file already exists, the string is written over the old version.
Writing a List
Modify the method public void save(String file, ArrayList<String> texts) so that it would write the strings of the second argument into the file of the first argument; each string of the array list has to go to its own line. If the file already exists, the strings are written over the old version.
Two-Direction Dictionary
With this exercise, we develop the dictionary we implemented earlier, so that words can be both read and written into the file. Also, the dictionary has to translate in both directions, from Finnish into English and from English into Finnish (in this exercise, we suppose unofficially that Finnish and English do not have words which are spellt the same). Your task is creating the dictionary in the class MindfulDictionary. The class has to be implemented in the package dictionary.
Forgetful Basic Functionality
Create a parameterless constructor, as well as the methods:
public void add(String word, String translation) adds a word to the dictionary. Each word has only one translation; if the same word is added twice, nothing happens.public String translate(String word) returns the word translation; if the word isn't recognised, it returns null
At this point, the dictionary has to work in the following way:
MindfulDictionary dict = new MindfulDictionary();
dict.add("apina", "monkey");
dict.add("banaani", "banana");
dict.add("apina", "apfe");

System.out.println( dict.translate("apina") );
System.out.println( dict.translate("monkey") );
System.out.println( dict.translate("programming") );
System.out.println( dict.translate("banana") );
Prints:
monkey
apina
null
banaani
As you notice from the example, after adding a pair the dictionary can translate in both directions.
Removing Words
Add the method public void remove(String word), which removes the given word and its translation from your dictionary.
At this point, the dictionary has to work in the following way:
MindfulDictionary dict = new MindfulDictionary();
dict.add("apina", "monkey");
dict.add("banaani", "banana");
dict.add("ohjelmointi", "programming");
dict.remove("apina");
dict.remove("banana");

System.out.println( dict.translate("apina") );
System.out.println( dict.translate("monkey") );
System.out.println( dict.translate("banana") );
System.out.println( dict.translate("banaani") );
System.out.println( dict.translate("ohjelmointi") );
Prints
null
null
null
null
programming
As you see, the delection happens in both ways: whether you remove a word or its translation, the dictionary loses the both the pieces of information.
Loading a File
Create the constructor public MindfulDictionary(String file) and the method public boolean load(), which loads a file whose name is given as parameter in the dictionary constructor. If opening or reading the file does not work, the method returns false and otherwise true.
Each line of the dictionary file contains a word and its translation, divided by the character ":". Together with the exercise body, you find a dictionary file meant to help the tests. It looks like the following:
apina:monkey
alla oleva:below
olut:beer
Read the dictionary file line by line with the reader method nextLine. You can split the lines with the String method split, in the following way:
Scanner fileReader = new ...
while ( fileReader.hasNextLine() ){
    String line = fileReader.nextLine();
    String[] parts = line.split(":");   // the line is split at :

    System.out.println( parts[0] );     // the part of the line before :
    System.out.println( parts[1] );     // the part of the line after :
}
The dictionary is used in the following way:
MindfulDictionary dict = new MindfulDictionary("src/words.txt");
dict.load();

System.out.println( dict.translate("apina") );
System.out.println( dict.translate("ohjelmointi") );
System.out.println( dict.translate("alla oleva") );
Printing
monkey
null
below
Saving Data
Create the method public boolean save(); when the method is called, the dictionary contents are written into the file whose name was given as parameter to the constructor. The method returns false if the file can't be saved; otherwise it returns true. Dictionary files have to be saved in the form described above, meaning that the program has to be able to read its own files.
Attention: even though the dictionary can translate in both directions, only one direction has to be stored into the dictionary file. For instance, if the dictionary knows that tietokone = computer, you have to write either the line:
tietokone:computer
or the line
computer:tietokone
but not both!
It may be useful to write the new translation list over the old file; in fact, the append command which came out in the material should not be used.
The final version of your dictionary should be used in the following way:
MindfulDictionary dict = new MindfulDictionary("src/words.txt");
dict.load();

// using the dictionary

dict.save();
At the beginning we load the dictionary from our file, and we save it back in the end, so that the changes made to the dictionary will be available next time, too.
User Interfaces
Attention! A part of the user interface tests opens a user interface and uses your mouse to click on the user interface components. When you are executing user interface tests, do not use your mouse!
So far, our programs have only been composed of application logic and text user interface which made use of application logic. In a couple of exercises we have also got a graphical user interface, but they had usually been created for us. Next, we see how we can create graphical user interfaces in Java.
User interfaces are windows which contain different types of buttons, text boxes, and menus. When we program user interfaces we use Java's Swing component library, which provides us with classes to create and handle user interfaces.
The basic element of a user interface is the class JFrame, and we create the user interface components in its component section. Orthodox user interfaces implement the interface Runnable, and they are started in the main program. In this course, we use the following user interface body:
import java.awt.Container;
import java.awt.Dimension;
import javax.swing.JFrame;
import javax.swing.WindowConstants;

public class UserInterface implements Runnable {

    private JFrame frame;

    public UserInterface() {
    }

    @Override
    public void run() {
        frame = new JFrame("Title");
        frame.setPreferredSize(new Dimension(200, 100));

        frame.setDefaultCloseOperation(WindowConstants.EXIT_ON_CLOSE);

        createComponents(frame.getContentPane());

        frame.pack();
        frame.setVisible(true);
    }

    private void createComponents(Container container) {
    }

    public JFrame getFrame() {
        return frame;
    }
}
Let's have a closer look the the user interface code above.
public class UserInterface implements Runnable {
The class UserInterface implements Java's Runnable interface, which allows us to execute a threaded program. Executing a threaded program means that we execute different parts of the program at the same time. We do not dig deeper into threads, but a further information on threads is provided by the course Operating Systems.
private JFrame frame;
The user interface contains a JFrame object as variable, which is the basic element of a visible user interface. All user interface components are added to the JFrame object component container. Note that object variables cannot be initiated outside the methods. For instance, an initialisation of the object variable JFrame with the class definition "private JFrame frame = new JFrame()" would evade user interface thread execution order, and it can lead to a breakdown.
    @Override
    public void run() {
        frame = new JFrame("Title");
        frame.setPreferredSize(new Dimension(200, 100));

        frame.setDefaultCloseOperation(WindowConstants.EXIT_ON_CLOSE);

        createComponents(frame.getContentPane());

        frame.pack();
        frame.setVisible(true);
    }
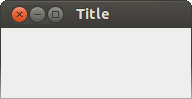
The interface Runnable defines the method public void run(), which has to be implemented by all classes which implement the interface. With the method public void run(), we first create a new JFrame whose title is "Title". After this, we define the frame size whose width is 200 pixels and height is 100 pixels. The statement frame.setDefaultCloseOperation(WindowConstants.EXIT_ON_CLOSE); tells to the JFrame object that the user interface has to close when the user presses the cross icon.
Afterwards, we call the method createComponents which is defined lower down in the class. The method is given JFrame's Container object as parameter, where we can add user interface components.
Finally, we call the method frame.pack() which packs the JFrame object as defined before and sorts the user interface components of the Container object contained by JFrame. At the end, we call the method frame.setVisible(true), to show the user interface to the user.
    private void createComponents(Container container) {
    }
In the method createComponents we add user interface components to the JFrame's container. In our example there is no UI component in addition to our JFrame window. The class UserInterface has also the method getFrame which we can use to retrieve the JFrame object which is encapsulated in the class.
Swing user interfaces are started through the method invokeLater, which is provided by the class SwingUtilities. invokeLater receives as parameter an object which implements the interface Runnable. The method adds the Runnable object to the execution queue and calls it as soon as possible. With the classSwingUtilities, we can start new threads when we need them.
import javax.swing.SwingUtilities;

public class Main {

    public static void main(String[] args) {
        UserInterface ui = new UserInterface();
        SwingUtilities.invokeLater(ui);
    }
}
When we execute the main method above, the user interface we have defined in the class UserInterface appears in our screen.
UI Components
User Interfaces are composed of a background window (JFrame) and a component Container, as well as the UI components which are set into the container. UI components are different kinds of buttons, texts, and other items. Every component has its own class. It's useful to get accustomed to Oracle visual sequence of components at the address http://docs.oracle.com/javase/tutorial/uiswing/components/index.html.
Text
Text can be displayed with the help of the class JLabel. JLabel provides a UI component which can be assigned text and whose text can be modified. The text is assigned either in the constructor, or separately, with the setText method.
Let's modify our UI container to display text. We create a new JLabel text component within the method createComponents. Then we retrieve the Container object from our JFrame object, and we add JLabel to Container using its add method.
private void createComponents(Container container) {
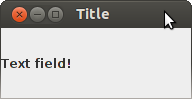
JLabel text = new JLabel("Text field!");
container.add(text);
}
As you see from the code above, JLabel shall display the text "Text field!". When we execute the user interface, we see the following window.
Greeter
Implement a user interface which displays the text "Hi!". The width of the user interface (i.e. of the JFrame object) has to be at least 400px, its height 200px, and its title should be "Swing on". The JFrame object should be created and become visible inside the method run(), and the text components are added to the user interface with the method createComponents(Container container).
ATTENTION: The ui object variables have to be initiated in the methods or in the constructor! Do not initiate an object variable directly in its definition.
Buttons
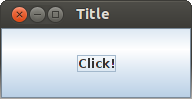
You can add buttons to your user interface using the class JButton. Adding a JButton object to your user interface is similar to adding a JLabel object.
    private void createComponents(Container container) {
        JButton button = new JButton("Click!");
        container.add(button);
    }
Next, we try to add both text and a button to our user interface.
    private void createComponents(Container container) {
        JButton button = new JButton("Click!");
        container.add(button);
        JLabel text = new JLabel("Text.");
        container.add(text);
    }
When we execute the program we see the following user interface.
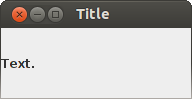
Only the last component we have added is visible, and our program does not work as we would expect. What is the problem, in fact?
Setting up UI Components
All UI components have got their own location in the user interface. The component location is defined by the UI Layout Manager. Before, when we tried to add many different components to our Container object, only one component became visible. Every Container object has a default UI layout manager: BorderLayout.
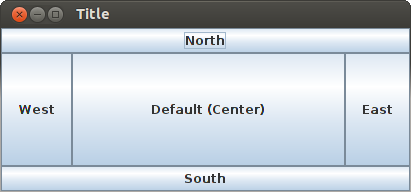
BorderLayout places the UI components to five areas: the user interface centre and the four compass points. When we use the Container's add method, we can give it another parameter, clarifying where we would like to place the component. the BorderLayout class has five class variables available for use: BorderLayout.NORTH, BorderLayout.EAST, BorderLayout.SOUTH, BorderLayout.WEST, ja BorderLayout.CENTER.
The UI layout manager we want to use is assigned to the Container object in the parameter of the method setLauout. In addition to the UI component, the method add can also be assigned the location wehere the component should be placed. In the example below, we assign a component to every BorderLayout location.
    private void createComponents(Container container) {
        // the following line is not essential in this case, because BorderLayout is default in JFrame
        container.setLayout(new BorderLayout());

        container.add(new JButton("North"), BorderLayout.NORTH);
        container.add(new JButton("East"), BorderLayout.EAST);
        container.add(new JButton("South"), BorderLayout.SOUTH);
        container.add(new JButton("West"), BorderLayout.WEST);
        container.add(new JButton("Center"), BorderLayout.CENTER);

        container.add(new JButton("Default (Center)"));
    }
Notice that the button "Center" is not visible in our user interface because the button "Default (Center)" is assigned to its place by default. A container with the code above will look like the following after increasing its size manually.
As for UI components, there are also many UI layout managers. Oracle has a visual guide to learn more about UI layout managers at http://docs.oracle.com/javase/tutorial/uiswing/layout/visual.html. Below, we introduce the layout manager BoxLayout.
BoxLayout
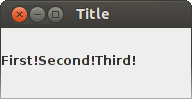
When we use BoxLayout, UI components are added into the user interface either horizontally or vertically. The BoxLayout constructor is given a Container object as parameter -- where we have been adding the UI components -- and the layout direction of the UI components. The layout direction can be either BoxLayout.X_AXIS, i.e. components are set up horizontally, or BoxLayout.Y_AXIS, i.e. the componets are set up vertically. Differently than BorderLayout, BoxLayout does not have a limited number of places. In other words, you can add to your Container as many components as you want.
Arranging the user interface with BoxLayout works as using BorderLayout. We first create the layout manager and we assign it to the Container object using its method setLayout. After this, we can add components to the Container object using the add method. We don't need a further parameter specifying the location. Below, you find an example of components placed in horizontal order.
    private void createComponents(Container container) {
        BoxLayout layout = new BoxLayout(container, BoxLayout.X_AXIS);
        container.setLayout(layout);

        container.add(new JLabel("First!"));
        container.add(new JLabel("Second!"));
        container.add(new JLabel("Third!"));
    }
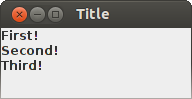
Setting up the components vertically does not require major changes. We modify the direction parameter of the BoxLayout constructor: BoxLayout.Y_AXIS.
    private void createComponents(Container container) {
        BoxLayout layout = new BoxLayout(container, BoxLayout.Y_AXIS);
        container.setLayout(layout);

        container.add(new JLabel("First!"));
        container.add(new JLabel("Second!"));
        container.add(new JLabel("Third!"));
    }
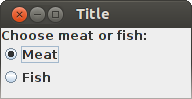
Using the different layout managers, we can create user interfaces where the components are set up appropriately. Below, there is an example of user interface where the components are placed vertically. First there is some text, and then an optional selection. You can create a multiple-exclusion scope for a set of buttons -- meaning that turning "on" one of those buttons turns off all the others in the group -- using ButtonGroup and JRadioButton.
    private void createComponents(Container container) {
        BoxLayout layout = new BoxLayout(container, BoxLayout.Y_AXIS);
        container.setLayout(layout);

        container.add(new JLabel("Choose meat or fish:"));

        JRadioButton meat = new JRadioButton("Meat");
        JRadioButton fish = new JRadioButton("Fish");

        ButtonGroup buttonGroup = new ButtonGroup();
        buttonGroup.add(meat);
        buttonGroup.add(fish);

        container.add(meat);
        container.add(fish);
    }
Once the UI is launched, and Meat is selected, the UI looks as follows.
Survey
Implement a user interface in the exercise body; the interface has to look like the following:
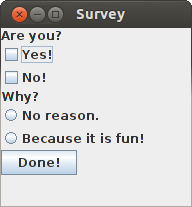
Use BoxLayout as layout manager for your user interface; the components are the classes JLabel, JRadioButton, JCheckBox and JButton.
Use the class ButtonGroup to make sure the options "No reason." and "Because it is fun!" cannot be chosen at the same time.
Make sure that the user interface is big enough so that the user can click the buttons without resizing the interface. For instance, you can use 200 pixels for the width and 300 pixels for the height.
Managing Action Events
So far, even though our user interfaces are beautiful, they are quite boring: they do not react in any way according to the actions done on the interfaces. Such unresponsiveness does not depend on our user interface components, but on the fact we haven't provided them with any way to listen to action events.
Action event listeners listen the UI components they are assigned to. Always when we perform an action on our UI components -- pressing a button, for instance -- the UI component calls a particular method of all the action event listeners assigned to it. Action event listeners are classes which implement a particular interface, and whose instances can be assigned to UI components. When an action event happens, the UI component goes through all its action event listeners, and calls the method defined by the interface.
The most used action event listener interface with Swing user interfaces is ActionListener. The interface ActionListener defines the method void actionPerformed(ActionEvent e), which receives an ActionEvent object as parameter.
Let's implement our first own action event listener, which has to print a message only when we press the relative button. The class MessageListener implements ActionListener and prints the message "Message received!" when the method actionPerformed is called.
import java.awt.event.ActionEvent;
import java.awt.event.ActionListener;

public class MessageListener implements ActionListener {

    @Override
    public void actionPerformed(ActionEvent ae) {
        System.out.println("Message received!");
    }
}
Next, we create the a JButton for our user interface, and we add a instance of MessageListener to it. The class JButton can be added an action event listener by using the method defined in its parent class AbstractButton: public void addActionListener(ActionListener actionListener).
    private void createComponents(Container container) {
        JButton button = new JButton("Send!");
        button.addActionListener(new MessageListener());

        container.add(button);
    }
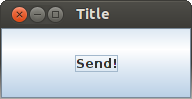
When we press the button in our user interface we see the following message.
Message received!
Handling Objects in the Action Event Listeners
Often, we want that an action event listener modified the state of an object. In order to have access to the object in the action event listener, the action event listener constructor has to be assigned a reference to the obejct concerned. Action eventlisteners are exactly similar to other Java's class, and we can program their whole functionality.
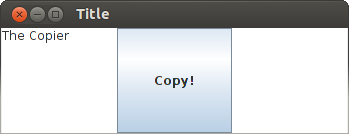
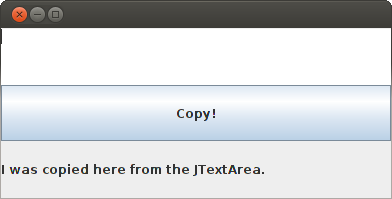
Let's take the following user interface, which has two JTextAreas -- where the user can input text, and a JButton. The user interface makes use of GridLayout, which makes the user interface look like a coordinate system. In the GridLayout constructor, we defined one line and three columns.
    private void createComponents(Container container) {
        GridLayout layout = new GridLayout(1, 3);
        container.setLayout(layout);

        JTextArea textAreaLeft = new JTextArea("The Copier");
        JTextArea textAreaRight = new JTextArea();
        JButton copyButton = new JButton("Copy!");

        container.add(textAreaLeft);
        container.add(copyButton);
        container.add(textAreaRight);
    }
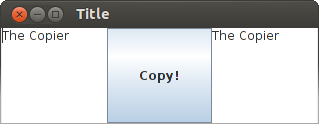
After a manual resize, the UI looks like the following.
We want to implement our user interface so that the text in the left area would be copied into the right area when we press the JButton. This is possible by implementing an action event listener. Let's create the class AreaCopier which implements ActionListener and copies the text from one to the other JTextArea.
import java.awt.event.ActionEvent;
import java.awt.event.ActionListener;
import javax.swing.JTextArea;

public class AreaCopier implements ActionListener {

    private JTextArea origin;
    private JTextArea destination;

    public AreaCopier(JTextArea origin, JTextArea destination) {
        this.origin = origin;
        this.destination = destination;
    }

    @Override
    public void actionPerformed(ActionEvent ae) {
        this.destination.setText(this.origin.getText());
    }
}
Adding the new action event listener to the JButton object is possible using the method addActionListener.
    private void createComponents(Container container) {
        GridLayout layout = new GridLayout(1, 3);
        container.setLayout(layout);

        JTextArea textAreaLeft = new JTextArea("The Copier");
        JTextArea textAreaRight = new JTextArea();
        JButton copyButton = new JButton("Copy!");

        AreaCopier copier = new AreaCopier(textAreaLeft, textAreaRight);
        copyButton.addActionListener(copier);

        container.add(textAreaLeft);
        container.add(copyButton);
        container.add(textAreaRight);
    }
When we press the button, the text in the left area is copied into the right one.
Notice Board
Implement a user interface in the exercise body; the interface has to look like the following:
The program has to be composed of the following classes, which are contained in the package noticeboard. The class NoticeBoard is the user interface class, and it is started from the Main class. The notice board has various different components: JTextField, JButton, and JLabel. You can manage the layout of the ui components with GridLayout: the call new GridLayout(3, 1) creates a new layout manager, which sets up three ui elements vertically.
The application also has to contain the class ActionEventListener, which implements the interface ActionListener. The action event listener is connected to the button, and when pressed, it has to copy the contents of the JTextField into JLabel. At the same time, it wipes the JTextField by setting its contents as "".
Make sure that the user interface is big enough to click on each button.
Separating Application and UI Logic
Mixing the application logic (the functionality to print or compute, for instance) and the user interface together in the same classes is usually a bad thing. It makes much more difficult to test and modify a program, and it makes the code much more difficult to read. As the single responsibility principle states: each class should have only one clear responsibility. Separating the application logic from the UI logic works smoothly planning your interfaces appropriately. Let's suppose, that we have got a the class PersonRecord, and we want to implement a user interface to record people.
public interface PersonRecord {
    void record(Person person);
    Person get(String id);

    void delete(Person person);
    void delete(String id);
    void deleteAll();

    Collection<Person> getAll();
}
UI Implementation
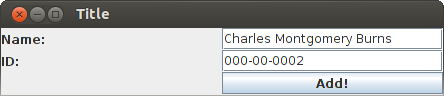
When we implement our user interface, a good start is adding the components to it. If we want to record people, we need fields for their name and their ID number, as well as a button to add the person. We use Java's JTextField to input text, and the class JButton to implement our button. In addition, we also create JLabel textual descriptions which tell the user what to do.
For our UI layout, we use GridLayout. There are three lines and two columns in our user interface. We add the action event listener later. The UI method createComponents looks like the following.
    private void createComponents(Container container) {
        GridLayout layout = new GridLayout(3, 2);
        container.setLayout(layout);

        JLabel textName = new JLabel("Name: ");
        JTextField nameField = new JTextField();
        JLabel textID = new JLabel("ID: ");
        JTextField idField = new JTextField();

        JButton addButton = new JButton("Add!");
        // event listener

        container.add(textName);
        container.add(nameField);
        container.add(textID);
        container.add(idField);
        container.add(new JLabel(""));
        container.add(addButton);
    }
After adding the information, our user interface looks like the following.
The action event listener has to know about the recording functionality (PersonRecord interface), as well as the fields it uses. Let's create the class PersonRecordListener which implements ActionListener. As constructor parameter, the class is assigned an object which implements the interface PersonRecord, as well as two JTextField objects which stand for the name and ID fields. In the method actionPerformed we create a new Person object and we record it using the record method of our PersonRecord object.
public class PersonRecordListener implements ActionListener {

    private PersonRecord personRecord;
    private JTextField nameField;
    private JTextField idField;

    public PersonRecordListener(PersonRecord personRecord, JTextField nameField, JTextField idField) {
        this.personRecord = personRecord;
        this.nameField = nameField;
        this.idField = idField;
    }

    @Override
    public void actionPerformed(ActionEvent ae) {
        Person person = new Person(nameField.getText(), idField.getText());
        this.personRecord.record(person);
    }
}
In order to retrieve a PersonRecord reference to PersonRecordListener, the user interface must have access to it. Let's add to our user interface the object variable private PersonRecord personRecord which is set up in the constructor. We also modify the constructor of the class UserInterface, which is assigned a class which implements the interface PersonRecord.
public class UserInteface implements Runnable {

    private JFrame frame;
    private PersonRecord personRecord;

    public UserInteface(PersonRecord personRecord) {
        this.personRecord = personRecord;
    }
    // ...
Now we can create the action event listener PersonRecordListener, which is given both a PersonRecord reference and the fields.
    private void createComponents(Container container) {
        GridLayout layout = new GridLayout(3, 2);
        container.setLayout(layout);

        JLabel nameText = new JLabel("Name: ");
        JTextField nameField = new JTextField();
        JLabel idText = new JLabel("ID: ");
        JTextField idField = new JTextField();

        JButton addButton = new JButton("Add!");
        PersonRecordListener listener = new PersonRecordListener(personRecord, nameField, idField);
        addButton.addActionListener(listener);

        container.add(nameText);
        container.add(nameField);
        container.add(idText);
        container.add(idField);
        container.add(new JLabel(""));
        container.add(addButton);
    }
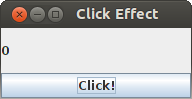
Axe Click Effect
In this exercise we implement a calculator to count the number of clicks. In the exercise, the application logic (counting) and the ui logic are divided from each other. The final application should look like the following, so far.
PersonalCalculator
Implement the class PersonalCalculator in the package clicker.applicationlogic; the class implements the interface Calculator. At first, the method giveValue of PersonalCalculator returns 0. Whenever the method increase is called, the value increases by one.
If you want, you can test the class using the following program.
        Calculator calc = new PersonalCalculator();
        System.out.println("Value: " + calc.giveValue());
        calc.increase();
        System.out.println("Value: " + calc.giveValue());
        calc.increase();
        System.out.println("Value: " + calc.giveValue());
Value: 0
Value: 1
Value: 2
ClickListener
Implement the class ClickListener in the package clicker.ui; the class implements the interface ActionListener. ClickListener receives two objects as constructor parameters: an object which implements the interface Calculator and a JLabel object.
Implement the actionPerformed method so that the Calculator object increases by one at first, and after it, the calculator value is set as text of the JLabel object. The text of the JLabel object can be modified with the method setText.
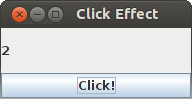
User Interface
Modify the class UserInterface; now the user interface has to receive a Calculator object as constructor parameter: you need a new constructor. Add the necessary ui components to your UserInterface. Also, set the action event listener you implemented in the previous section to the button.
Use the functionality provided by the class BorderLayout to manage the layout of the ui components. Also, change the Main class so that the user interface is assigned a PersonalCalculator object. When the "Click!" button in the user interface has been pressed twice, the application looks like below, more or less.
Nested Container Objects
Sometimes we end up in a situation, where the Container object provided by JFrame is not suitable enough for our UI layout. We may want our user interface to look different or to group up UI components according to their use. For instance, building a user interface like the one below would not be so easy, using only the Container object provided by the class JFrame.
We can place Container objects inside each other. The class JPanel (see also How to Use Panels) allows for nested Container objects. It is possible to add UI components to a JPanel instance in the same way we add components to the Container instance of JFrame class. Moreover, it is possible to add an instance of JPanel to a Container object. This makes possible to use many Container objects to develop one user interface.
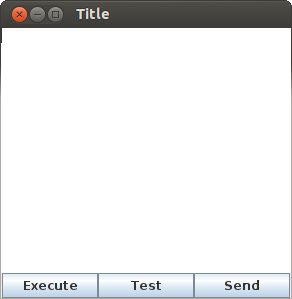
Creating a user interface like the one above is easier with JPanel. Let's create a user interface with three buttons -- Execute, Test, and Send -- plus a text field. The buttons are a group on its own, and we assign them to a JPanel object which is placed in the lower part of the Container object which we have got from JFrame class.
    private void createComponents(Container container) {
        container.add(new JTextArea());
        container.add(createPanel(), BorderLayout.SOUTH);
    }

    private JPanel createPanel() {
        JPanel panel = new JPanel(new GridLayout(1, 3));
        panel.add(new JButton("Execute"));
        panel.add(new JButton("Test"));
        panel.add(new JButton("Send"));
        return panel;
    }
The JPanel class is given as constructor parameter the layout style to use. If in its constructor the layout style requires a reference to the Container object used, the JPanel class also has the method setLayout.
If our user interface has clear, separate, groups of components we can also inherit the JPanel class. For instance, the panel above could be implemented in the following way, too.
import java.awt.GridLayout;
import javax.swing.JButton;
import javax.swing.JPanel;

public class MenuPanel extends JPanel {

    public MenuPanel() {
        super(new GridLayout(1, 3));
        createComponents();
    }

    private void createComponents() {
        add(new JButton("Execute"));
        add(new JButton("Test"));
        add(new JButton("Send"));
    }
}
Now we can create a MenuPanel instance in our user interface class.
    private void createComponents(Container container) {
        container.add(new JTextArea());
        container.add(new MenuPanel(), BorderLayout.SOUTH);
    }
Note that in case you need an action event listener, the class MenuPanel must be given all the objects its need as parameter.
Calculator
The goal of the exercise is creating a simple calculator. The calculator user interface has to look like the following:
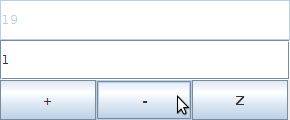
Together with the exercise body, you find the main program which starts the calculator, as well as the class GraphicCalculator which contains a graphic user interface. The user interface has to follow exactly the following points, but you can plan the program structure as you wish. Note: GraphicCalculator provides empty methods run, createComponents and getFrame.
The Layout
You find a JFrame with the exercise body; you manage its layout using GridLayout with three lines and one column. JTextField has to be placed in the upper block and has to be used for the text output; it must be set off with the method call setEnabled(false). The second block has to contain JTextField for the text input. Originally, the input field contains the text "0", and the input field is empty.
The lowest block has to contain JPanel, and this has to have the layout manager GridLayout, with one line and three columns. The panel has three JButtons, with texts "+", "-" and "Z".
Basic Functionality
The calculator basic functionality is the following. When the user writes a number n into the input field and presses +, the value of the output field is added n and the output field is updated with a new value. Accordingly, when the user writes a number n into the input field and presses -, the value of the output field is decreased by n, and the output field is updated with the new value. If the user presses Z, the output field value is reset to zero.
Cozy Management
Let's extend our program with the following features:
- If the output field is 0, the user can't press the Z button, i.e. the button has to be set off with the method call
setEnabled(false). Otherwise, the button has to be on. - When the user presses any of the buttons +, -, Z the input field is wiped.
- If the input value is not an integer and the user presses one of the buttons +, -, Z, the input field is wiped and the value of the output field does not change (unless the button is Z).
Drawing
Its Container functionality is not the only reason why we use the class JPanel: it is also used as drawing board, and the user inherits the JPanel class and overrides the method protected void paintComponent(Graphics graphics). The user interface calls the method paintComponent whenever we want to draw again the UI component contents. The parameter of the method paintComponent receives from the user interface an object which implements the abstract class Graphics. Let's create the class DrawingBoard JPanel which inherits from JPanel and which overrides the paintComponent method.
public class DrawingBoard extends JPanel {

    public DrawingBoard() {
        super.setBackground(Color.WHITE);
    }

    @Override
    protected void paintComponent(Graphics graphics) {
        super.paintComponent(graphics);
    }
}
The drawing board above does not contain concrete drawing functionality. In the constructor, we can define the colour of our drawing board to be white by calling its superclass' method setBackground. The method setBackGround receives an instance of the class Color as parameter. The class Color contains the most common colours as class variables; for instance, you get the white colour using the class variable Color.WHITE.
The overridden paintComponent method calls the superclass' paintComponent method, and it does not do anything else. Let's add the drawing board to the createComponents method of class UserInterface. We use the user interface which was defined at the beginning of the section 58. User Interfaces.
    private void createComponents(Container container) {
        container.add(new DrawingBoard());
    }
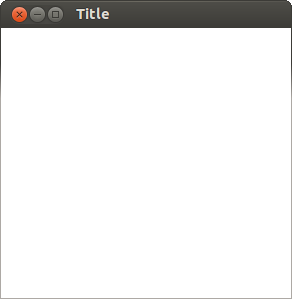
When we start our user interface we see an empty screen, whose background colour is white. The size of the user interface below is set to 300x300 through the method setPreferredSize, and its title is "Drawing Board".
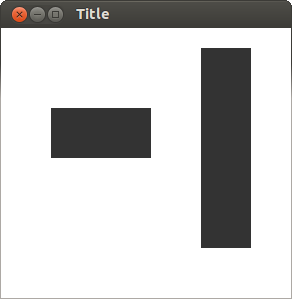
Drawing on the board is possible using the methods provides by the Graphics object. Let's modify the method paintComponent of DrawingBoard and let's draw two rectangles using the method fillRect of the Graphics object.
    @Override
    protected void paintComponent(Graphics graphics) {
        super.paintComponent(graphics);

        graphics.fillRect(50, 80, 100, 50);
        graphics.fillRect(200, 20, 50, 200);
    }
The method fillRect receives as parameter the x and y coordinates of a rectangle, plus the rectangle width and height. In fact, above we first draw a rectangle which starts with pixel whose coordinates are (50, 80), which is 100 pixels long, and 50 pixels high. Afterwards, we draw a 50-pixel long, 100-pixel high rectangle which begins at (200, 20).
As you notice from the picture, the coordinate system does not work as we are accustomed to.
Java's Graphics object (and most of other programming language libraries) expects the value of the y axis to grow downwards. The coordinate system origin, i.e. the point (0,0) is in the upper left corner: the Graphics object always knows the UI component where we draw, and it is able to define the location of the point to draw based on it. The location of the UI origin can become clear with the help of the following program. First we draw a green 10-pixel long, 200-pixel high rectangle which starts from the point (0,0). Then we draw a black 200-pixel long, 10-pixel high rectangle which starts from the point (0,0). The drawing colour is defined by the method setColor of our Graphics object.
    @Override
    protected void paintComponent(Graphics graphics) {
        super.paintComponent(graphics);

        graphics.setColor(Color.GREEN);
        graphics.fillRect(0, 0, 10, 200);
        graphics.setColor(Color.BLACK);
        graphics.fillRect(0, 0, 200, 10);
    }

Such coordinate system reversibility depends on the way user interface size is modified. When we modify the size of a user interface, this is reduced or increased by "dragging the bottom right corner"; in this way, the drawing on the screan would move while we change the UI size. Because the grid starts from the upper left corner, the drawing position is always the same, but the visible part changes.
Drawing Board
With the exercise body, you find a pre-made user interface, which is connected to the class DrawingBoard, which inherits JPanel. Modify the method paintCOmponent of DrawingBoard so that it would draw the following figure. You can only use the fillRect method of the graphics object, in this exercise.

Attention! Do not use more than five fillRect calls. The figure does not have to be identical to the one above, the tests tell you when your figure is close enough to the required one.
Let's extend our previous example and draw an independent avatar-object in our user interface. Let's create the class Avatar; it has the coordinates of the point where it appears, and it is a circle with a 10-pixel diameter. The location of the avatar can be changed by calling its move method.
import java.awt.Graphics;

public class Avatar {

    private int x;
    private int y;

    public Avatar(int x, int y) {
        this.x = x;
        this.y = y;
    }

    public int getX() {
        return x;
    }

    public int getY() {
        return y;
    }

    public void move(int movingX, int movingY) {
        this.x += movingX;
        this.y += movingY;
    }

    public void draw(Graphics graphics) {
        graphics.fillOval(x, y, 10, 10);
    }
}
Let's modify our drawing board, giving it an instance of our Avatar as constructor parameter. The method paintComponent of DrawingBoard does not draw the character itself, but it delegates the responsibility to the instance of the class Avatar.
import java.awt.Color;
import java.awt.Graphics;
import javax.swing.JPanel;

public class DrawingBoard extends JPanel {

    private Avatar avatar;

    public DrawingBoard(Avatar avatar) {
        super.setBackground(Color.WHITE);
        this.avatar = avatar;
    }

    @Override
    protected void paintComponent(Graphics graphics) {
        super.paintComponent(graphics);
        avatar.draw(graphics);
    }
}
Let's also give our avatar as parameter to our user interface. Avatar is an independent object in the user interface, and we only want to draw it in the user interface. It is essential to change our UI constructor so that it received a Avatar object. Moreover, in the method createComponents we give an instance of the class Avatar as parameter to our DrawingBoard object.
public class UserInterface implements Runnable {

    private JFrame frame;
    private Avatar avatar;

    public UserInterface(Avatar avatar) {
        this.avatar = avatar;
    }

// ...

    private void createComponents(Container container) {
        DrawingBoard drawingBoard = new DrawingBoard(avatar);
        container.add(drawingBoard);
    }
// ...
Now, our user interface can be started giving it an Avatar object as constructor parameter.
        UserInterface ui = new UserInterface(new Avatar(30, 30));
        SwingUtilities.invokeLater(ui);
![]()
In the user interface above, we see a ball-like Avatar.
Let's now add the functionality to move the avatar. We want to move it using our keyboard. When the user presses the left arrow, the avatar should move left. Pressing the right arrow should move the avatar right. We need an action event listener, which would listen to our keyboard. The interface KeyListener defines the functionality needed to listener to a keyboard.
The interface KeyListener calls for implementing the methods keyPressed, keyReleased, and keyTyped. We are only interested to the case in which the keyboard is pressed, so we can leave empty the methods keyReleased and keyTyped. Let's create the class KeyboardListener, which implements the interface KeyListener. The class receives as parameter a Avatar object, and the action event manager has to shift it.
import java.awt.event.KeyEvent;
import java.awt.event.KeyListener;

public class KeyboardListener implements KeyListener {

    private Avatar avatar;

    public KeyboardListener(Avatar avatar) {
        this.avatar = avatar;
    }

    @Override
    public void keyPressed(KeyEvent e) {
        if (e.getKeyCode() == KeyEvent.VK_LEFT) {
            avatar.move(-5, 0);
        } else if (e.getKeyCode() == KeyEvent.VK_RIGHT) {
            avatar.move(5, 0);
        }
    }

    @Override
    public void keyReleased(KeyEvent e) {
    }

    @Override
    public void keyTyped(KeyEvent ke) {
    }
}
The method keyPressed receives as parameter an instance of KeyEvent from the user interface. The KeyEvent object knows the number related to the pressed key thanks to its method getKeycode(). Different keys have got different class variables in the KeyEvent class; for instance, the left arrow is KeyEvent.VK_LEFT.
We want to listen to the keystrokes directed to our user interface (we don't want to write to the text field, for instance), and therefore we assign our keyboard listener to the JFrame instance. Let's modify our user interface and add the keyboard listener to the JFrame object.
    private void createComponents(Container container) {
        DrawingBoard drawingBoard = new DrawingBoard(avatar);
        container.add(drawingBoard);

        frame.addKeyListener(new KeyboardListener(avatar));
    }
Our application now listens to keystrokes, and it leads them to the instance of the class KeyboardListener.
However, when we try out our user interface it does not work: the avatar does not move on the screen. What is the problem, in fact? We can check the keystrokes which are received by our KeyboardListener by adding a text printout to the beginning of our keyPressed method.
    @Override
    public void keyPressed(KeyEvent e) {
        System.out.println("Keystroke " + e.getKeyCode() +  " pressed.");

        // ...
If we start our program and press some keys we will notice the following output.
Keystroke 39 pressed.
Keystroke 37 pressed.
Keystroke 40 pressed.
Keystroke 38 pressed.
In fact, our keyboard listener works, but our drawing board does not update.
Drawing Board Repainting
User interface components usually have the functionality to repaint the component outer face, when needed. For instance, when we press the button, the instance of the class JButton is able to paint the button as if it was pressed, and to paint it normal again afterwards. The drawing board we have implemented does not have a pre-made update functionality; instead, we have to ask our drawing board to paint itself again when needed.
Each subclass of Component has the method public void repaint(), which repaints the component after it is called. We want that our DrawingBoard object would get repainted while the avatar moves. The avatar moves in the class KeyboardListener, and it is logic the repainting would happen there, too.
In order to be repainted, our keyboard listener needs a drawing board reference. Let's modify our class KeyboardListener, so that it would receive as parameter both an Avatar object and the Component object to repaint. We call the repaint method of the Component object after each keyPressed action event.
import java.awt.Component;
import java.awt.event.KeyEvent;
import java.awt.event.KeyListener;

public class KeyboardListener implements KeyListener {

    private Component component;
    private Avatar avatar;

    public KeyboardListener(Avatar avatar, Component component) {
        this.avatar = avatar;
        this.component = component;
    }

    @Override
    public void keyPressed(KeyEvent e) {
        if (e.getKeyCode() == KeyEvent.VK_LEFT) {
            avatar.move(-5, 0);
        } else if (e.getKeyCode() == KeyEvent.VK_RIGHT) {
            avatar.move(5, 0);
        }

        component.repaint();
    }

    @Override
    public void keyReleased(KeyEvent e) {
    }

    @Override
    public void keyTyped(KeyEvent ke) {
    }
}
Let's also modify the createComponents method of UserInterface and give an instance of DrawingBoard as parameter to our keyboard listener.
    private void createComponents(Container container) {
        DrawingBoard drawingBoard = new DrawingBoard(hahmo);
        container.add(drawingBoard);

        frame.addKeyListener(new KeyboardListener(avatar, drawingBoard));
    }
Now, our avatar's moves are visible also in the user interface. Whenever the user presses the keyboard, the user interface keyboard listener handles the call. At the end of each call, the repaint method of our drawing board is called, and the drawing board gets repainted.
![]()
A Moving Figure
We create a program which allows the user to move the figures drawn on a board using their keyboard. Together with the program you find the body of a user interface, which you can modify as your program proceeds.
At first, we create a couple of classes to manage the figures. Later on we will be able to draw the figures to our board. Create all the classes of the program in the package movingfigure.
In this exercise we make use of both inheritance and abstract classes: go back to sections 18.1, 18.2, and 18.5, if you need.
Figure: an Abstract Class
Create the abstract class Figure. Figures have the object variables x and y, which tell the figure position on the board; they also have the method public void move(int dx, int dy), which moves the figures according to the parameter coordinate movements. For instance, if the position is (100,100), at the beginning, after calling the method move(10,-50) the position will be (110,50). The class constructor public Figure(int x, int y) has to define the original position of the figure. Additionally, implement also the methods public int getX() and public int getY().
The class also has to have the abstract method public abstract void draw(Graphics graphics), which draws the figure on the drawing board. The figure drawing method is implemented in the classes which inherit Figure.
Circle
Create the class Circle which inherits Figure. Circle has a diameter, whose value is defined by the constructor public Circle(int x, int y, int diameter). The Circle position is stored into the object variables defined in its parent class.
The circle defines the method draw so that it would draw a circle of the right size, in the place defined by the coordinates, and using the method fillOval of the Graphics object; the first two parameters of the method are taken for the position of the circle. Take example from the relative method in the Avatar example. For more information about the methods of Graphics objects, you can have a look at Java's API.
Drawing Board
Create the class DrawingBoard which inherits JPanel; you can take example from the drawing board in the previous exercise, for instance. DrawingBoard receives a Figure object as parameter. Override JPanel's method protected void paintComponent(Graphics g) so that it first calls the superclass' paintComponent method, and then the draw method of the figure which was assigned to the drawing board.
Modify the class UserInterface so that it would receive a Figure object as constructor parameter. Assign your DrawingBoard to the user interface together with the createComponents(Container container) method, and assign to the drawing board the figure which was given to the user interface as constructor parameter.
Finally, test that the following sample code draws a circle on the screen.
        UserInterface ui = new UserInterface(new Circle(50, 50, 250));
        SwingUtilities.invokeLater(ui);
Keyboard Listener
Let's extend our drawing board, so that we could move the figures using our keyboard arrows. Create the class KeyboardListener which implements the interface KeyListener. The class KeyboardListener has two constructor parameters: an instance of the class Component and one of the class Figure.
The instance of Component is given to the keyboard listener so that the component would be updated each time the keyboard is pressed. The component is updated with the method call repaint, which is inherited from he class Component. The type of the class DrawingBoard is Component, because Component is the upper class of the class which inherits JPanel.
Implement the method keyPressed(KeyEvent e) of the interface KeyListener; when the user presses the left arrow, the figure moves one point left. Pressing right, the figure moves one point right. Pressing up it moves one point up, and pressing down the figure moves one point down. Note that the y axe grows from the upper side of the window downwards. The arrow key codes are KeyEvent.VK_LEFT, KeyEvent.VK_RIGHT, KeyEvent.VK_UP, and KeyEvent.VK_DOWN. Leave empty the other methods required by the interface KeyListener.
Always call class Component's method repaint in the end of keylistener event.
Add keylistener in the UserInterface's method addListeners. KeyListener must be connected to JFrame-object.
Square and Box
Let Square and Box inherit the class Figure. Square has the constructor public Square(int x, int y, int sideLength); the constructor of box is public Box(int x, int y, int width, int height). Use the method fillRect of a graphic object to draw the figures.
Make sure that squares and boxes are drawn and move right on the DrawingBoard.
        UserInterface ui = new UserInterface(new Square(50, 50, 250));
        SwingUtilities.invokeLater(ui);

        UserInterface ui = new UserInterface(new Box(50, 50, 100, 300));
        SwingUtilities.invokeLater(ui);

Compound Figure
Let CompoundFigure inherit Figure. Compound figure contains other figures which are stored in an ArrayList. CompoundFigure has the method public void add(Figure f), which adds a new Figure object to the compound figure. Compound figures do not have their own position, and it is not important what values are assigned to x and y coordinates. Compound figures draw themselves by asking their parts to draw themselves; the same thing happens when a compound figure moves. This means that the inherited method move has to be overwritten!
You can test whether your compound figure moves and is drawn well using the following code:
        CompoundFigure truck = new CompoundFigure();

        truck.add(new Box(220, 110, 75, 100));
        truck.add(new Box(80, 120, 200, 100));
        truck.add(new Circle(100, 200, 50));
        truck.add(new Circle(220, 200, 50));

        UserInterface ui = new UserInterface(truck);
        SwingUtilities.invokeLater(ui);

Note how the object responsibilities are shared here. Each Figure is in charge of drawing and moving itself. Simple figures all move in the same way. Each simple figure has to manage their own drawing themselves. Compound figures move by asking their parts to move, and the same thing happens when it comes to be drawn. The drawing board knows a Figure object which, in fact, can be whatever simple figure or a compound figure: they are all drawn and moved in the same way. In fact, the drawing board works correctly regardless of the real type of the figure; the drawing board does not have to know the details of the figure. When the drawing board calls the method draw or move of the figure, the method of the real type of the figure is called, thanks to polymorphism.
It's worth to notice that CompoundFigure can contain whatever Figure object, even another CompoundFigure! The class structure allows for highly complex figure formations, whereas figures move and draw themselves always in the same way.
The class structure can also be expanded easily; for instance, a compound figure would work without needing changes even if we created new types which inherit Figure (say Triangle, Point, Line, exc.), and the same thing would apply to the drawing board and user interface.
Pre-made Application Frameworks
An application framework is a program which provides a baseline and a set of features to implement a particular application. One way to create an application framework is to create a class which provides pre-made features, so that classes can inherit it and build a particular application. Application frameworks are usually wide, and they are thought for a special purpose, for instance to program games or develop web-applications. Let's quickly get acquainted with a pre-made application library, by greating the application logic of a Game of Life.
Game of Life
In this exercise, we implement the application logic of a Game of Life, inheriting a pre-made application body.The application body is in a library which has been added to the project singularly, and its source codes are not visible.
ATTENTION: your task won't be extremely difficult, but the exercise descriptions may look a bit confusing, at first. Read the instruction carefully, or ask for help if you can't get started. The exercise is definitely worth of your energies, because the result is beautiful!
Game of Life is a simple "population simulator" which was developed by the mathematician John Conway; see http://en.wikipedia.org/wiki/Conway%27s_Game_of_Life.
Game of Life rules:
- Every living cell dies if they have less than two living neighbours.
- Every living cell keeps on living during the following iteration (i.e. turn) if they have two or three living neighbours.
- Every living cell dies if they have more than three living neighbours.
- Every dead cell is turned back to life if they have exactly three living neighbours.
The abstract class GameOfLifeBoard provides the following functionality
- public GameOfLifeBoard(int length, int height) creates a game board of the defined dimensions
- public boolean[][] getBoard() provides access to the game board, which is a bidimensional table containing boolean values – as you may guess from the method return value! We come back to bidimensional boards later on when needed.
- public int getWidth() returns the board width
- public int getHeight() returns the board height
- public void playTurn() simulates a turn of the game
The class GameOfLifeBoard has also got the following abstract method, which you will have to implement.
- public abstract void turnToLiving(int x, int y) animates the cell whose coordinates are (x, y), that is to say it assigns the value true to it. If the coordinates are outside the board, nothing happens.
- public abstract void turnToDead(int x, int y) kills the cell whose coordinates are (x, y), that is to say it assigns the value false to it. If the coordinates are outside the board, nothing happens.
- public abstract boolean isAlive(int x, int y) tells whether the cell at (x, y) is alive. If the coordinates are outside the board, the method returns false.
- public abstract void initiateRandomCells(double probabilityForEachCell) initiates all the cells of the board: every cell is alive with a probability of probabilityForEachCell. The probability is a double value between [0, 1]. If a method is called with value 1, all the cells have to be alive. Accordingly, if the probability is 0, all the cells have to be dead.
- public abstract int getNumberOfLivingNeighbours(int x, int y) tells the number of living neighbours for the cell at (x, y).
- public abstract void manageCell(int x, int y, int livingNeighbours) managese the cell (x, y) according to the rules of the Game of Life.
GameOfLife implementation, Part 1
Create the class PersonalBoard into the package game; PersonalBoard inherits the class GameOfLifeBoard which is in the package gameoflife. Note that the package gameoflife is not visible in your project, but it comes together with the class library. In the class PersonalBoard, implement the constructor public PersonalBoard(int width, int height), which calls the superclass constructor with the given parameters:
import gameoflife.GameOfLifeBoard;

public class PersonalBoard extends GameOfLifeBoard {

    public PersonalBoard(int width, int height) {
        super(width, height);
    }

    // ..
You can first replace all the abstract methods with non-abstract ones, which do not do anything particular anyway, so far. However, because the methods are not abstract, this class can create instances, differently than the abstract class GameOfLifeBoard.
Implement the following methods
- public abstract void turnToLiving(int x, int y) animates the cell whose coordinates are (x, y), that is to say it assigns the value true to it. If the coordinates are outside the board, nothing happens.
- public abstract void turnToDead(int x, int y) kills the cell whose coordinates are (x, y), that is to say it assigns the value false to it. If the coordinates are outside the board, nothing happens.
- public abstract boolean isAlive(int x, int y) tells whether the cell at (x, y) is alive. If the coordinates are outside the board, the method returns false.
Hint: You have access to the bidimensional table of the superclass through the superclass method getBoard(). Bidimensional tables are used as normal tables, but they are assigned two indexes. The first index tells
the row
and the second tells
the column. For instance, the following program chunk creates a 10 x 10 table, and prints the value at (3,1).
boolean[][] values = new boolean[10][10];
System.out.println(values[3][1]);
Accordingly, we can print the value at (x,y) of our PersonalBoard's superclass, in the following way:
boolean[][] board = getBoard();
System.out.println(board[x][y]);
And an index (x,y) can be assigned a value in the following way:
boolean[][] board = getBoard();
board[x][y] = true;
Or straight, using a helping variable:
getBoard()[x][y] = true;
Test your implementation with the following program.
package game;

public class Main {
    public static void main(String[] args) {
        PersonalBoard board = new PersonalBoard(7, 5);

        board.turnToLiving(2, 0);
        board.turnToLiving(4, 0);

        board.turnToLiving(3, 3);
        board.turnToLiving(3, 3);

        board.turnToLiving(0, 2);
        board.turnToLiving(1, 3);
        board.turnToLiving(2, 3);
        board.turnToLiving(3, 3);
        board.turnToLiving(4, 3);
        board.turnToLiving(5, 3);
        board.turnToLiving(6, 2);

        GameOfLifeTester tester = new GameOfLifeTester(board);
        tester.play();
    }
}
The output should look like the following:
Press enter to continue, otherwise quit: <enter>

  X X

X     X
 XXXXX

Press enter to continue, otherwise quit: stop
Thanks!
GameOfLife implementation, Part 2
Implement the method public abstract void initiateRandomCells(double probabilityForEachCell) initiates all the cells of the board: every cell is alive with a probability of probabilityForEachCell. The probability is a double value between [0, 1].
Test the method. Given the value 0.0, there should be no cell alive; given the value 1.0, all the cells should be alive (i.e. visible in the form of X characters). With the value 0.5, around fifty precent of the cells should be alive.
        PersonalBoard board = new PersonalBoard(3, 3);
        board.initiateRandomCells(1.0);

        GameOfLifeTester tester = new GameOfLifeTester(board);
        tester.play();
Press enter to continue, otherwise quit: <enter>

XXX
XXX
XXX
Press enter to continue, otherwise quit: stop
Thanks!
GameOfLife Implementation, part 3
Implement the method getNumberOfLivingNeighbours(int x, int y), which calculates the number of neighbour cells which are alive. Central cells have eight neighbours, the ones on the side have five, and the ones in the corner have only three.
Test the method with the following sentences (of course, you can create your own test instances!):
PersonalBoard board = new PersonalBoard(7, 5);

board.turnToLiving(0, 1);
board.turnToLiving(1, 0);
board.turnToLiving(1, 2);
board.turnToLiving(2, 2);
board.turnToLiving(2, 1);

System.out.println("Neighbours alive (0,0): " + board.getNumberOfLivingNeighbours(0, 0));
System.out.println("Neighbours alive (1,1): " + board.getNumberOfLivingNeighbours(1, 1));
The print output should look like the following:
Neighbours alive (0,0): 2
Neighbours alive (1,1): 5
GameOfLife Implementation, Part 4
Only one method is missing: manageCell(int x, int y, int livingNeighbours). Game of Life rules were the following:
- Every living cell dies if they have less than two living neighbours.
- Every living cell keeps on living during the following iteration (i.e. turn) if they have two or three living neighbours.
- Every living cell dies if they have more than three living neighbours.
- Every dead cell is turned back to life if they have exactly three living neighbours.
Implement the method manageCell(int x, int y, int livingNeighbours) according to the following rules. It's good to program and test one rule at one time!
When you are done with all the rule, you can test the program with the following graphic simulator.
package game;

import gameoflife.Simulator;

public class Main {

    public static void main(String[] args) {
        PersonalBoard board = new PersonalBoard(100, 100);
        board.initiateRandomCells(0.7);

        Simulator simulator = new Simulator(board);
        simulator.simulate();
    }
}